Kia Cadenza YG: Brake System / Brake Line Repair procedures
Kia Cadenza YG 2016-2021 Service Manual / Brake System / Brake System / Brake Line Repair procedures
| Removal |
| 1. |
Disconnect the brake fiuid level switch connector, and remove the reservoir cap. |
| 2. |
Remove the brake fluid from the master cylinder reservior with a syringe.
|

| 3. |
Remove the wheel & tire. |
| 4. |
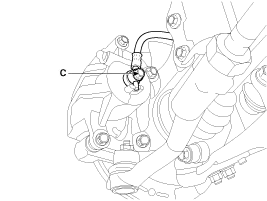
Disconnect the brake tube by loosening the tube flare nut (B).
Front
Rear
|


| 5. |
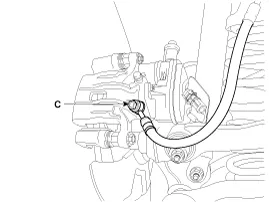
Remove the brake hose clip (A). |
| 6. |
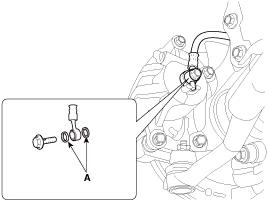
Disconnect the brake hose from the brake caliper by loosening the bolt (C).
Front
Rear [Without EPB]
Rear [With EPB]
|

| Inspection |
| 1. |
Check the brake tubes for cracks, crimps and corrosion. |
| 2. |
Check the brake hoses for cracks, damage and fluid leakage. |
| 3. |
Check the brake tube flare nuts for damage and fluid leakage. |
| 4. |
Check brake hose mounting bracket for crack or deformation. |
| Installation |
| 1. |
Installation is the reverse of removal.
|
| 2. |
After installation, bleed the brake system. (Refer to Brake system bleeding) |
| 3. |
Check the spilled brake oil. |
Components 1. Cowl bracket2. Brake pedal member assembly3. Stop lamp switch4. Return spring5. Brake pedal stopper6. Clevis pin7. Snap pin8. Brake pedal
Other information:
Kia Cadenza YG 2016-2021 Service Manual: Immobilizer Control Unit Repair procedures
Removal 1. Disconnect the negative (-) battery terminal. 2. Remove the crash pad lower panel. (Refer to Body - "Crash Pad") 3. Disconnect the 5P connector of the SMARTRA unit and then remove the SMARTRA unit (A) after loosening the bolt. Installation 1.
Kia Cadenza YG 2016-2021 Service Manual: Description and Operation
Description System Operation Typically, lane departure warning is activated at a speed over 70 KPH, but suppressed in case of unintentional lane departure when driver do not operate turn signal. System Operation Conditions 1. User Conditions (1) When unintended lane departure is occured, warnings are generated.
Categories
- Manuals Home
- Kia Cadenza Owners Manual
- Kia Cadenza Service Manual
- Timing Chain Repair procedures
- Schematic Diagrams
- Specifications
- New on site
- Most important about car

Copyright © 2026 www.kcadenzavg.com - 0.0264