Kia Cadenza: Engine Mechanical System / Special Service Tools
Kia Cadenza YG 2016-2025 Service Manual / Engine Mechanical System / Special Service Tools
| Special Service Tools |
| Tool (Number and name) | Illustration | Use |
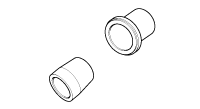
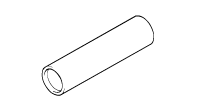
| Crankshaft front oil seal installer (09231-3C100) |
| Installation of the front oil seal |
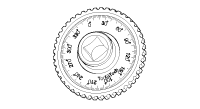
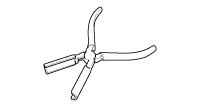
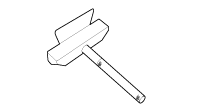
| Ring gear stopper (09231-2B100) |
| Removal and installation of crankshaft pulley bolt |
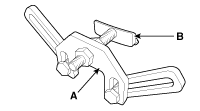
| Ring gear stopper A : (09231-3D100) B : (09231-2W100) |
| Removal and installation of crankshaft pulley bolt. |
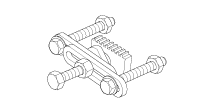
| Torque angle adapter (09221-4A000) |
| Installation of bolts & nuts needing an angular method |
| Valve stem seal remover (09222-29000) |
| Removal of the valve stem seal |
| Valve stem seal installer (09222-2W100) |
| Installation of the valve stem seal |
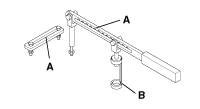
| Valve spring compressor & holder (09222-3K000) (09222-3K100) |
| Removal and installation of the intake or exhaust valves A : 09222-3K000 B : 09222-3K100 (holder) |
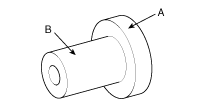
| Crankshaft rear oil seal installer (09231-3C200) (09231-H1100) |
| Installation of the crankshaft rear oil seal A : 09231-3C200 B : 09231-H1100 |
| Oil pan remover (09215-3C000) |
| Removal of oil pan |
 Specifications
Specifications
DescriptionSpecificationsLimitGeneralTypeV-type, DOHCNumber of cylinders6Bore92mm(3.6220in.)Stroke83.8mm(3.2992in.)Total displacement3,342cc(203.94cu.in.)Compression ratio11.5 : 1F ...
 Compression Test
Compression Pressure Inspection
If the there is lack of power, excessive oil consumption or poor fuel economy, measure the compression pressure.
1.
Warm up engine u ...
Other information:
Kia Cadenza YG 2016-2025 Service Manual: Description and Operation
Description Automatic transaxle system relies on various measurement data to determine the current control status and extrapolate the necessary compensation values. These values are used to control the actuators and achieve the desired control output. If a problem with the drivetrain, inc ...
Kia Cadenza YG 2016-2025 Service Manual: High Mounted stop lamp Repair procedures
Removal 1. Disconnect the negative(-) battery terminal. 2. Remove the roof trim. (Refer to Body - "Roof Trim") 3. Disconnect the connector of high mounted stop lamp. 4. Remove the high mounted stop lamp (B) after removing the bolts (2EA). Installation 1. Install the high mounte ...
Copyright © www.kcadenzavg.com 2017-2025
