Kia Cadenza YG: Timing System / Crankshaft Damper Pulley Repair procedures
Kia Cadenza YG 2016-2021 Service Manual / Engine Mechanical System / Timing System / Crankshaft Damper Pulley Repair procedures
| Removal and Installation |
|

Mark all wiring and hoses to avoid misconnection. |

| 1. |
Remove the battery and tray.
(Refer to Engine Electrical System - "Battery") |
| 2. |
Remove the engine cover. |
| 3. |
Remove the air duct and air cleaner assembly.
(Refer to Intake And Exhaust System - "Air Cleaner") |
| 4. |
Remove the engine room under cover.
(Refer to Engine And Transaxle Assembly - "Engine Room Under Cover") |
| 5. |
Remove the front muffler.
(Refer to Intake And Exhaust System - "Muffler") |
| 6. |
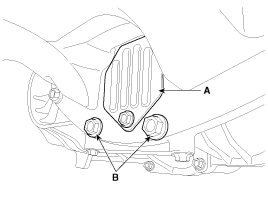
Remove the crankshaft damper pulley (A).
|

| 7. |
Install in the reverse order of removal. |
| Inspection |
Check the pulleys for vibration in rotation, oil or dust deposit of V-ribbed part. Replace if necessary.
Components 1. Crankshaft damper pulley
Components 1. Front oil seal
Other information:
Kia Cadenza YG 2016-2021 Service Manual: Description and Operation
Description Surround View Monitoring System (SVM) is the system that allows video monitoring of 360 degrees around the vehicle. The system includes 4 ultra optical camera mounted around the vehicle (front, both sides, rear). The video from these cameras are applied with distortion compensation, time point conversion, and video merging
Kia Cadenza YG 2016-2021 Service Manual: Power Mosfet Repair procedures
Inspection 1. Ignition "ON" 2. Manually operate the control switch and measure the voltage of blower motor. 3. Select the control switch to raise voltage until high speed. Specification FanMotor VoltageManualFirst speed3.8 ±0.5VSecond speed5.
Categories
- Manuals Home
- Kia Cadenza Owners Manual
- Kia Cadenza Service Manual
- Emission Control System
- Suspension System
- Schematic Diagrams
- New on site
- Most important about car

Copyright © 2026 www.kcadenzavg.com - 0.0219