Kia Cadenza YG: Seat Belt Pretensioner / Emergency Fastening Device (EFD) Repair procedures
Kia Cadenza YG 2016-2021 Service Manual / Restraint / Seat Belt Pretensioner / Emergency Fastening Device (EFD) Repair procedures
| Removal |
| 1. |
Disconnect the battery negative cable, and wait for at least thirty seconds before beginning work. |
| 2. |
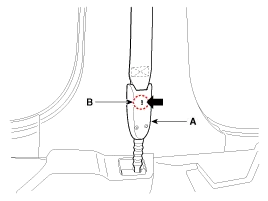
The seat belt emergency fastening device (A) be removed after pushing the lock pin (B) as arrow direction.
|
| 3. |
Remove the door scuff trim.
(Refer to Body - "Door scuff trim") |
| 4. |
Remove the center pillar trim.
(Refer to Body - "Center pillar trim") |
| 5. |
Disconnect the emergency fastening device connector (A).
|

| 6. |
Loosen the emergency fastening device mounting bolt (B) and remove the emergency fastening device. |
| Installation |
| 1. |
Remove ignition key from the vehicle. |
| 2. |
Disconnect the negative (-) cable from battery and wait for at least thirty seconds. |
| 3. |
Install the emergency fastening device with a bolt.
|
| 4. |
Connect the emergency fastening device connector. |
| 5. |
Install the center pillar trim.
(Refer to Body - "Center pillar trim") |
| 6. |
Install the door scuff trim.
(Refer to Body - "Door scuff trim") |
| 7. |
Insert the seat belt to the emergency fastening device (A).
|


| 8. |
Reconnect the battery negative cable. |
| 9. |
After installing the emergency fastening device , confirm proper system operation:
|
Other information:
Kia Cadenza YG 2016-2021 Service Manual: Specifications
S
Kia Cadenza YG 2016-2021 Service Manual: Climate Control Air Filtar Repair procedures
Replacement 1. Disconnect the damper (B) from the glove box (A) and then remove the glove box lift (C). 2. Remove the filter cover (A) with pushing the knob. 3. Replace the air filter (B), install it after making sure of the direction of air filter.
Categories
- Manuals Home
- Kia Cadenza Owners Manual
- Kia Cadenza Service Manual
- Transaxle Control Module (TCM) Repair procedures
- Body Electrical System
- Engine Control / Fuel System
- New on site
- Most important about car

Copyright © 2026 www.kcadenzavg.com - 0.0208