Kia Cadenza YG: Charging System / Battery Sensor Repair procedures
Kia Cadenza YG 2016-2021 Service Manual / Engine Electrical System / Charging System / Battery Sensor Repair procedures
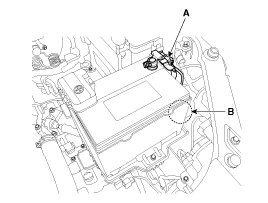
| Removal |
| 1. |
Turn the ignition switch OFF and disconnect the battery negative (-) cable. |
| 2. |
Disconnect the battery sensor connector (A). |
| 3. |
Remove the battery negative (-) cable after removing the bolt (B).
|
| Installation |
| 1. |
Install in the reverse order of removal.
|

| Adjustment |
Battery Sensor Recalibration Procedure
After reconnecting the battery negative cable, AMS function
does not operates until the system is stabilized, about 4 hours. If
disconnecting the negative (-) battery cable from the battery during
repair work for the vehicle equipped with AMS function, Battery sensor
recalibration procedure should be performed after finishing the repair
work.
| 1. |
Turn the Iginition switch ON and OFF. |
| 2. |
Park the vehicle for about 4 hours with the hood and all doors closed. |
Description Vehicles have many control units that use more electricity. These units control their own system based on information from diverse sensors.
Other information:
Kia Cadenza YG 2016-2021 Service Manual: A/C Pressure Transducer Repair procedures
Inspection 1. Measure the pressure of high pressure line by measuring voltage output between NO.1 and NO.2 terminals. 2. Inspect the voltage value whether it is sufficient to be regular value or not. Voltage = 0.00878835 * Pressure + 0.37081095 [PSIA] 3.
Kia Cadenza YG 2016-2021 Service Manual: Ambient Sensor Description and Operation
Description 1. The ambient temperature sensor is located at the front of the condenser and detects ambient air temperature. It is a negative type thermistor resistance will increase with lower temperature, and decrease with higher temperatures.
Categories
- Manuals Home
- Kia Cadenza Owners Manual
- Kia Cadenza Service Manual
- Components and Components Location
- Restraint
- Engine Control / Fuel System
- New on site
- Most important about car

Copyright © 2026 www.kcadenzavg.com - 0.0323