Kia Cadenza YG: Fuel Delivery System / Filler-Neck Assembly Repair procedures
| Removal |
| 1. |
Open the fuel filler door and then remove the filler-neck installation screw (A).
|

| 2. |
Lift the vehicle. |
| 3. |
Remove the rear-LH wheel, tire, and the inner wheel house. |
| 4. |
Disconnect the fuel filler hose (A). |
| 5. |
Disconnect the ventilation hose (B) from the fuel tank air filter.
|

| 6. |
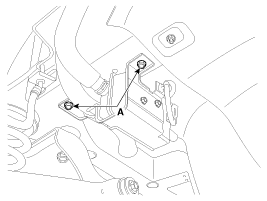
Remove the filler-neck assembly from the vehicle after removing the bracket installation bolt (A).
|
| Installation |
| 1. |
Install in the reverse order of removal.
|
Removal In case of removing the high pressure fuel pump, high pressure fuel pipe, delivery pipe, and injector, there may be injury caused by leakage of the high pressure fuel.
Removal 1. Turn the ignition switch OFF and disconnect the negative (-) battery cable. 2. Disconnect the accelerator position sensor connector (A).
Other information:
Kia Cadenza YG 2016-2021 Service Manual: Description and Operation
Description System Overview The System offers the following features: – Human / machine interface through a 1-stage button, for terminal switching and engine start. – Control of external relays for ACC / IGN1 / IGN2 terminal switching and STARTER, without use of mechanical ignition switch.
Kia Cadenza YG 2016-2021 Service Manual: Climate Control Air Filtar Repair procedures
Replacement 1. Disconnect the damper (B) from the glove box (A) and then remove the glove box lift (C). 2. Remove the filter cover (A) with pushing the knob. 3. Replace the air filter (B), install it after making sure of the direction of air filter.
Categories
- Manuals Home
- Kia Cadenza Owners Manual
- Kia Cadenza Service Manual
- Body Electrical System
- Components and Components Location
- Brake System
- New on site
- Most important about car
