Kia Cadenza YG: Seat Belt / Rear Seat Belt Repair procedures
Rear Seat Belt Retractor Replacement
•
When installing the belt, make sure not to damaged the retractor.
1.
Remove the following items first.
•
Rear seat assembly
(Refer to the BD group - "Rear Seat")
•
Rear Piller trim
(Refer to the BD group - "Interior Trim")
•
Package tray trim
(Refer to the BD group - "Interior Trim")
2.
After loosening the mounting bolt, then remove the rear seat belt lower anchor (A).
Tightening torque :
39.2 ~ 53.9 N.m (4.0 ~ 5.5 kgf.m, 28.9 ~ 39.8 lb-ft)
3.
After loosening the retractor (B) mounting bolts, then remove the rear seat belt (A).
Tightening torque :
39.2 ~ 53.9 N.m (4.0 ~ 5.5 kgf.m, 28.9 ~ 39.8 lb-ft)
4.
Installation is the reverse of removal.
•
Replace ant damaged clips.
Rear Center Seat Belt Retractor Replacement
•
When installing the belt, make sure not to damage the retractor.
1.
Remove the following items first :
•
Rear seat assembly
(Refer to the BD group - "Rear Seat")
•
Rear piller trim
(Refer to the BD group - "Interior Trim")
•
Package tray trim
(Refer to the BD group - "Interior Trim")
2.
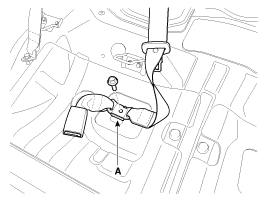
After loosening the mounting bolt, then remove the rear center seat belt lower anchor (A).
Tightening torque :
39.2 ~ 53.9 N.m (4.0 ~ 5.5 kgf.m, 28.9 ~ 39.8 lb-ft)
3.
After loosening the mounting bolt, then remove the rear center seat belt retractor (A).
Tightening torque :
39.2 ~ 53.9 N.m (4.0 ~ 5.5 kgf.m, 28.9 ~ 39.8 lb-ft)
4.
Installation is the reverse of removal.
Rear Seat Belt Buckle Replacement
1.
Remove the rear seat.
(Refer to the BD group - "Rear Seat")
2.
Loosen the mounting bolt, and then remove the rear seat belt buckle (A).
Tightening torque :
39.2 ~ 53.9 N.m (4.0 ~ 5.5 kgf.m, 28.9 ~ 39.8 lb-ft)
[LH]
[RH]
3.
Installation is the reverse of removal.
Replacement
Front Seat Belt Replacement
•
When installing the belt, make sure not to damaged the pretensioner.
Other information: Removal
Height Sensor
1.
Disconnect the negative (-) battery terminal.
2.
Remove the height sensor linkage (A) installed on the front axle and rear axle.
[Front]
[Rear]
Installation
Height Sensor
1.
Install the height sensor assembly after connecting the connector.
Description
System Operation
Typically, lane departure warning is activated at a speed
over 70 KPH, but suppressed in case of unintentional lane departure when
driver do not operate turn signal.
System Operation Conditions
1.
User Conditions
(1)
When unintended lane departure is occured, warnings are generated.