Kia Cadenza YG: Timing System / Timing Chain Components and Components Location
| Components |
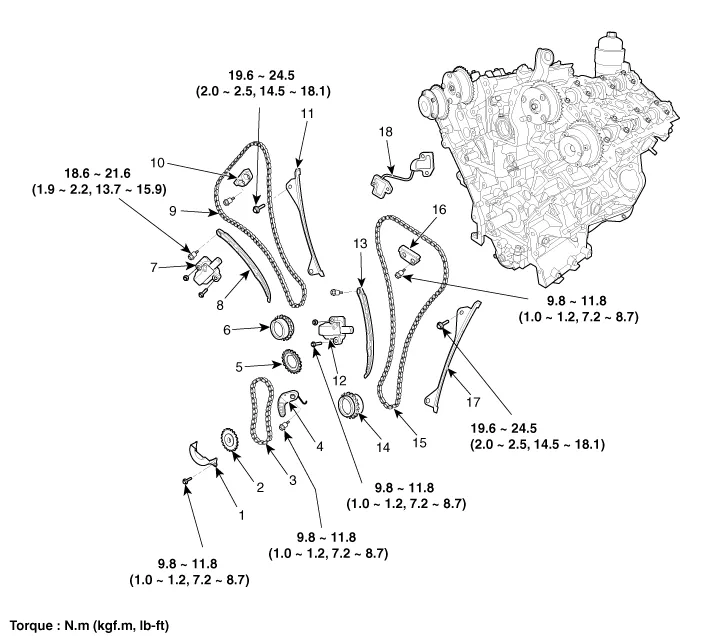
| 1. Oil pump chain cover 2. Oil pump sprocket 3. Oil pump chain 4. Oil pump tensioner assembly 5. Crankshaft oil pump sprocket 6. Crankshaft RH chain sprocket | 7. RH Timing chain auto tensioner 8. RH Timing chain tensioner arm 9. RH Timing chain 10. RH Timing chain cam to cam guide 11. RH Timing chain guide 12. LH Timing chain auto tensioner | 13. LH Timing chain tensioner arm 14. Crankshaft LH chain sprocket 15. LH Timing chain 16. LH Timing chain cam to cam guide 17. LH Timing chain guide 18. Tensioner adapter |
Removal 1. Remove the LH/RH cylinder head cover. (Refer to Cylinder Head Assembly - "Cylinder Head Cover") 2. Remove the lower oil pan. (Refer to Lubrication System - "Oil Pan") 3.
Removal 1. Set No.1 cylinder to TDC/compression. (1) Turn the crankshaft pulley clockwise and align its groove with the timing mark "T" of the lower timing chain cover.
Other information:
Kia Cadenza YG 2016-2021 Service Manual: Adaptive Front Lighting System Description and Operation
Description AFLS Unit(ECU) AFLS located in Cockpit Module is provided information of vehicle (steering wheel signal,vehicle speed, inclination of vehicle). Based on provided information , it calculates algorithm and adjust Low beam of H/Lamp. It transmits driving information by using LIN protocol, it is operated in Fail-safe reaction mode
Kia Cadenza YG 2016-2021 Service Manual: Description and Operation
Description System Overview The System offers the following features: – Human / machine interface through a 1-stage button, for terminal switching and engine start. – Control of external relays for ACC / IGN1 / IGN2 terminal switching and STARTER, without use of mechanical ignition switch.
Categories
- Manuals Home
- Kia Cadenza Owners Manual
- Kia Cadenza Service Manual
- Engine Electrical System
- Timing Chain Repair procedures
- Emission Control System
- New on site
- Most important about car
