Kia Cadenza: Windshield defrosting and defogging / Defogging logic
To reduce the possibility of fogging
up the inside of the windshield, the
air intake or air conditioning is controlled
automatically according to
certain conditions such as  or
or
.gif) position. To cancel automatic defogging
logic or return to the automatic
defogging logic, do the following.
position. To cancel automatic defogging
logic or return to the automatic
defogging logic, do the following.
Automatic climate control system
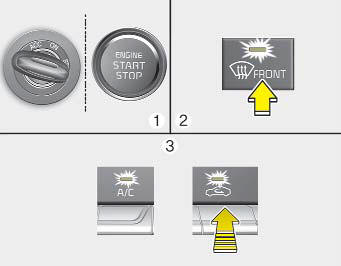
1. Turn the Engine Start/Stop button to the ON position.
2. Press the defroster button ().
3. While pressing the air conditioning button (A/C), press the air intake control button at least 5 times within 3 seconds.
The recirculation indicator blinks 3 times with 0.5 second of interval. It indicates that the defogging logic is canceled or returned to the programmed status.
If the battery has been discharged or disconnected, it resets to the defog logic status.
 Automatic climate control
system
Automatic climate control
system
To defog inside windshield
1. Set the fan speed to the desired
position.
2. Select desired temperature.
3. Press the defroster button ().
4. The outside (fresh) air position will
be selected ...
 Auto defogging system
Auto defogging reduces the probability
of fogging up the inside of the
windshield by automatically sensing
the moisture of inside the windshield.
The auto defogging system operates
when the ...
Other information:
Kia Cadenza YG 2016-2025 Service Manual: Relay Box (Engine Compartment) Repair procedures
Inspection Power Relay Test (Type A) – Do not use pliers. – Pliers will damage the relays, which could cause the engine to stall or not start. – Carefully remove the relay using the relay puller. Check for continuity between the ...
Kia Cadenza YG 2016-2025 Service Manual: Components and Components Location
Components 1. HECU module2. Front wheel speed sensor3. Rear wheel speed sensor4. Yaw rate & Lateral G sensor5. Steering angle sensor6. ABS Warning lamp7. Parking brake/EBD warning lamp8. ESC OFF lamp9. ESC Function/Warning lamp ...
