Kia Cadenza YG: Timing System / Drive Belt Repair procedures
Kia Cadenza YG 2016-2021 Service Manual / Engine Mechanical System / Timing System / Drive Belt Repair procedures
| Removal and Installation |
| 1. |
Disconnect the battery negative terminal. |
| 2. |
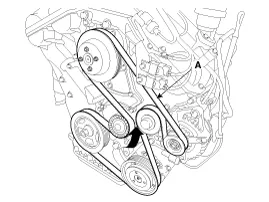
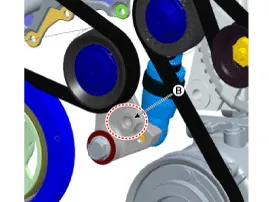
To release the tension, turn the drive belt tensioner counterclockwise then remove the drive belt (A).
|

| 3. |
Installation is reverse order of removal |
| Inspection |
Visually check the belt for excessive wear, frayed cords etc.
If any defect has been found, replace the drive belt.
Cracks on the rib side of a belt are considered acceptable.
If the belt has chunks missing from the ribs, it should be
replaced. |

Components 1. Drive belt
Components 1. Idler
Other information:
Kia Cadenza YG 2016-2021 Service Manual: Condenser Repair procedures
Inspection 1. Check the condenser fins for clogging and damage. If clogged, clean them with water, and blow them with compressed air. If bent, gently bend them using a screwdriver or pliers. 2. Check the condenser connections for leakage, and repair or replace it, if required.
Kia Cadenza YG 2016-2021 Service Manual: Heater & A/C Control Unit (DATC) Components and Components Location
C
Categories
- Manuals Home
- Kia Cadenza Owners Manual
- Kia Cadenza Service Manual
- Battery Troubleshooting
- Specifications
- Automatic Transaxle System
- New on site
- Most important about car

Copyright © 2026 www.kcadenzavg.com - 0.0201