Kia Cadenza YG: Seat Belt Pretensioner / Emergency Fastening Device (EFD) Repair procedures
Kia Cadenza YG 2016-2021 Service Manual / Restraint / Seat Belt Pretensioner / Emergency Fastening Device (EFD) Repair procedures
| Removal |
| 1. |
Disconnect the battery negative cable, and wait for at least thirty seconds before beginning work. |
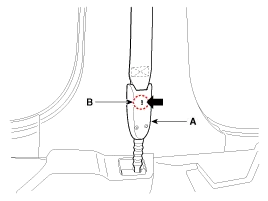
| 2. |
The seat belt emergency fastening device (A) be removed after pushing the lock pin (B) as arrow direction.
|
| 3. |
Remove the door scuff trim.
(Refer to Body - "Door scuff trim") |
| 4. |
Remove the center pillar trim.
(Refer to Body - "Center pillar trim") |
| 5. |
Disconnect the emergency fastening device connector (A).
|

| 6. |
Loosen the emergency fastening device mounting bolt (B) and remove the emergency fastening device. |
| Installation |
| 1. |
Remove ignition key from the vehicle. |
| 2. |
Disconnect the negative (-) cable from battery and wait for at least thirty seconds. |
| 3. |
Install the emergency fastening device with a bolt.
|
| 4. |
Connect the emergency fastening device connector. |
| 5. |
Install the center pillar trim.
(Refer to Body - "Center pillar trim") |
| 6. |
Install the door scuff trim.
(Refer to Body - "Door scuff trim") |
| 7. |
Insert the seat belt to the emergency fastening device (A).
|


| 8. |
Reconnect the battery negative cable. |
| 9. |
After installing the emergency fastening device , confirm proper system operation:
|
Other information:
Kia Cadenza YG 2016-2021 Service Manual: Description and Operation
Description System Overview The System offers the following features: – Human / machine interface through a 1-stage button, for terminal switching and engine start. – Control of external relays for ACC / IGN1 / IGN2 terminal switching and STARTER, without use of mechanical ignition switch.
Kia Cadenza YG 2016-2021 Service Manual: Temperature Control Actuator Description and Operation
D
Categories
- Manuals Home
- Kia Cadenza Owners Manual
- Kia Cadenza Service Manual
- General Information
- Engine Control / Fuel System
- Alternator Schematic Diagrams
- New on site
- Most important about car

Copyright © 2026 www.kcadenzavg.com - 0.0172