Kia Cadenza YG: Lighting System / Front Fog Lamps Repair procedures
| Inspection |
| 1. |
Disconnect the negative(-) battery terminal. |
| 2. |
Remove the lighting switch of the multi-function switch. (Refer to the multi-function switch) |
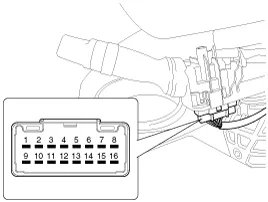
| 3. |
With the front fog lamp switch, make sure that continuity exists between the terminals below.
If continuity is not as specified, replace the multi-function switch.
Front Fog Lamp
|

| Removal |
| 1. |
Disconnect the negative (-) battery terminal. |
| 2. |
Remove the front wheel housing.
(Refer to Body - "Front Bumper") |
| 3. |
Disconnect the front fog lamp connector (A) and remove the cover (B).
|

| 4. |
Replace the front fog bulb (C) turning it in the counterclockwise direction. |
| 5. |
Remove the front fog lamp (A) after removing the screws.
|

| Installation |
| 1. |
Install the front fog bulb. |
| 2. |
Reconnect the lamp connector. |
| 3. |
Install the front wheel housing. |
Inspection 1. Disconnect the negative (-) battery terminal. 2. Remove the passenger compartment juction box cover. 3. Remove the side cover (A).
Removal 1. Disconnect the negative(-) battery terminal. 2. Remove the roof trim. (Refer to Body - "Roof Trim") 3. Disconnect the connector of high mounted stop lamp.
Other information:
Kia Cadenza YG 2016-2021 Service Manual: Compressor Repair procedures
Removal 1. If the compressor is marginally operable, run the engine at idle speed, and let the air conditioning work for a few minutes, then shut the engine off. 2. Disconnect the negative cable from the battery. 3. Recover the refrigerant with a recovery/charging station.
Kia Cadenza YG 2016-2021 Service Manual: Cluster ionizer Description and Operation
Description 1. The function of cluster ion generator is cleaning air by sterilizing and dissolving of air conditioner. 2. The function of cluster ion generator is controlling mold caused by stench of air conditioner and external inflow of air.
Categories
- Manuals Home
- Kia Cadenza Owners Manual
- Kia Cadenza Service Manual
- Emission Control System
- Engine Electrical System
- Alternator Schematic Diagrams
- New on site
- Most important about car
