
Kia Cadenza YG: Power Door Mirrors / Power Out Side Mirror Switch Repair procedures
| Inspection |
| 1. |
The DDM inputs can be checked using the GDS. |
| 2. |
To check the input value of door lock switch, select option "IPM". |
| 3. |
Select option "DDM (Driver Door Module)". |
| 4. |
Select option "Input/Output monitoring".
|

| 5. |
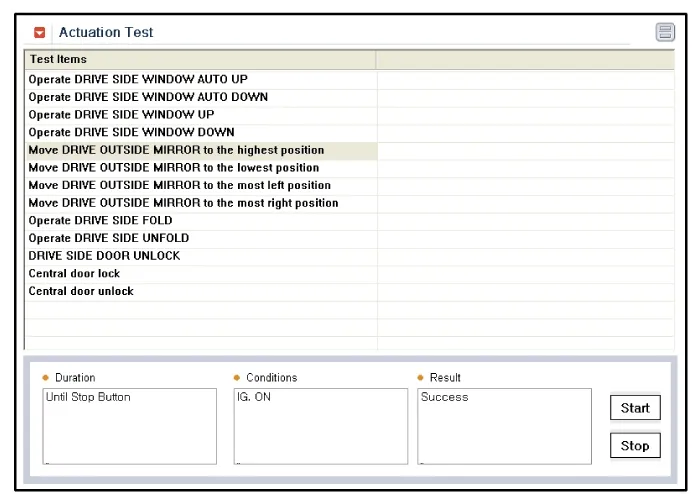
To check the input value of door lock switch in force mode, select option "ACTUATION TEST".
|
| Removal |
| 1. |
Disconnect the negative(-) battery terminal. |
| 2. |
Remove the front door trim panel.
(Refer to Body - "Front Door") |
| 3. |
Disconnect the power window switch module connector (A) from the wiring harness.
|

| 4. |
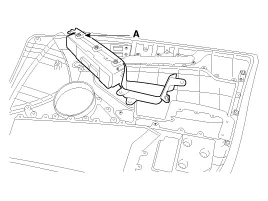
Remove the power window switch module (A) from the door trim after loosening the mounting screws (13EA).
|
| 5. |
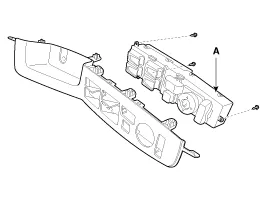
Remove the module (A) from the sub box assembly after loosening the mounting screw (3EA).
|

| Installation |
| 1. |
Install the power window switch module. |
| 2. |
Install the door trim panel after reconnecting the relevant connectors
|
Inspection 1. Remove the front door quadrant delta cover. (Refer to Body - "Front Door") 2. Disconnect the power door mirror connector from the harness.
Other information:
Kia Cadenza YG 2016-2021 Service Manual: Repair procedures
Teaching Procedures 1. Key Teaching Procedure Key teaching must be done after replacing a defective PCM(ECM) or when providing additional keys to the vehicle owner. The procedure starts with an PCM(ECM) request for vehicle specific data (PIN code: 6digits) from the tester.
Kia Cadenza YG 2016-2021 Service Manual: Blower Unit Repair procedures
Replacement 1. Disconnect the negative (-) battery terminal. 2. Remove the heater and blower unit.(Refer to HA group – heater unit). 3. Remove the blower unit (A) from the heater unit after loosening a mounting bolt and 3 screws. Make sure that there is no air leaking out of the blower and duct joints.
Categories
- Manuals Home
- Kia Cadenza Owners Manual
- Kia Cadenza Service Manual
- Engine Electrical System
- Timing Chain Repair procedures
- Emission Control System
- New on site
- Most important about car
