Kia Cadenza YG: Seat & Power Seat / Rear Seat Repair procedures
Kia Cadenza YG 2016-2021 Service Manual / Body (Interior and Exterior) / Seat & Power Seat / Rear Seat Repair procedures
| Replacement |
Seat Assembly Replacement
| 1. |
Remove the rear seat cushion (A).
|

| 2. |
Disconnect the rear seat cushion heater connectors (A).
|

| 3. |
After loosening the mounting bolts, then remove the rear seat back (A).
|
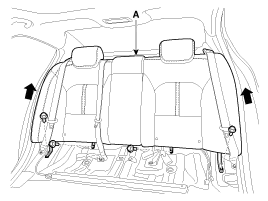
| 4. |
Disconnect the rear seat back heater (A) and airbag (B) connectors.
[LH]
[RH]
|


| 5. |
Installation is the reverse of removal.
|

Rear Seat Back Cover Replacement
|
| 1. |
Remove the rear seat assembly. |
| 2. |
Push the lock pin (B), remove the headrest (A).
|

| 3. |
Pull out the headrest guides (A) while pinching the end of the guides, and remove them.
|

| 4. |
Remove the hogring clips (A).
|

| 5. |
Disconnect the hogring clips (B) on the rear of seat back, remove the seat back cover (A).
|

| 6. |
Installation is the reverse of removal.
|

Rear Seat Cushion Cover Replacement
|
| 1. |
Remove the rear seat cushion. |
| 2. |
Remove the hogring clips (A).
|

| 3. |
Disconnect the hogring clips (B) on the rear of seat cushion, remove the seat cushion cover (A).
|

| 4. |
Installation is the reverse of removal.
|
Armrest Replacement
| 1. |
Remove the rear seat back assembly. |
| 2. |
Disconnect the connectors (A), and mounting wireing clips (B).
|

| 3. |
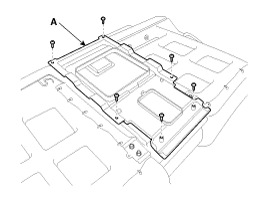
Loosen the armrest back panel mounting bolts.
|

| 4. |
After loosening the mounting screws, then remove the armrest back panel (A).
|
| 5. |
Remove the armrest (A).
|

| 6. |
Installation is the reverse of removal.
|
Components 1. Rear luggage bar2. Headrest3. Headrest guide4. Rear back armrest5. Web guide6. Rear seat back pad7. Sab support bracket8. Rear back heater unit assembly9.
Other information:
Kia Cadenza YG 2016-2021 Service Manual: Specifications
Specification ItemSpecificationUltrasonic sensorVoltage ratingDC 12 VDetecting range30 cm ~ 120 cmOperation voltageDC 9 ~ 16 VOperation currentMAX 300 mAOperation temperature-30°C ~ +80°C (-22°C ~ +176°C)Operation frequency48 ± 5 KHzEffective operating velocity10 KPH (6.
Kia Cadenza YG 2016-2021 Service Manual: Description and Operation
Description BSD is a system that uses two magnetic wave radar sensors attached on the rear bumper to measure the distance from the following vehicles and provides the sensing and (visual and auditory) alarm of any vehicle coming into the blind spot.
Categories
- Manuals Home
- Kia Cadenza Owners Manual
- Kia Cadenza Service Manual
- Engine Control / Fuel System
- Brake System
- Timing Chain Repair procedures
- New on site
- Most important about car

Copyright © 2026 www.kcadenzavg.com - 0.0216