Kia Cadenza YG: SRSCM / SRS Control Module (SRSCM) Repair procedures
Kia Cadenza YG 2016-2021 Service Manual / Restraint / SRSCM / SRS Control Module (SRSCM) Repair procedures
| Removal |
| 1. |
Remove the ignition key from the vehicle. |
| 2. |
Disconnect the battery negative cable and wait for at least three minutes before beginning work. |
| 3. |
Remove the floor console. (Refer to the Body group - console) |
| 4. |
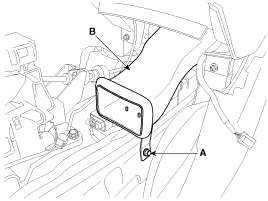
After removing the bolt (A), remove the rear vent duct (B).
|
| 5. |
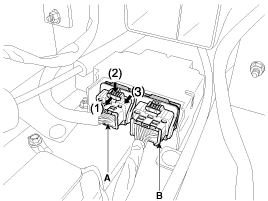
Pull the lock (1) forward and the pull the lever (3) after pressing the lever lock (2).
Disconnect the SRSCM connector (A) and (B).
|
| 6. |
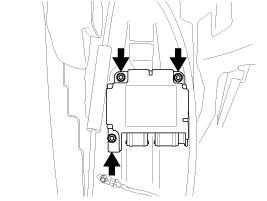
Remove the SRSCM mounting bolts(3EA) from the SRSCM, then remove the SRSCM. |
| Installation |
| 1. |
Remove the ignition key from the vehicle. |
| 2. |
Disconnect the battery negative cable and wait for at least three minutes before beginning work. |
| 3. |
Install the SRSCM with the SRSCM mounting bolts.
|

| 4. |
Connect the SRSCM harness connector. |
| 5. |
Install the rear vent duct and floor console. (Refer to the Body group - console) |
| 6. |
Reconnect the battery negative cable. |
| 7. |
After installing the SRSCM, confirm proper system operation:
|
| Variant coding |
After replacing the SRSCM, the “Variant Coding” must be performed.
|
Variant coding Procedure
Description The front impact sensor (FIS) is installed in the Front End Module (FEM). They are remote sensors that detect acceleration due to a collision at its mounting location.
Other information:
Kia Cadenza YG 2016-2021 Service Manual: Pantoscopic Camera Components and Components Location
C
Kia Cadenza YG 2016-2021 Service Manual: Troubleshooting
Troubleshooting Examples of False-Alarm Occurrence from system characteristics (It’s not a problem) – Characteristics of EM Wave : EM Waves are reflected against all material and especially metal very well. Reflections of EM Waves are varies with the shape of object.
Categories
- Manuals Home
- Kia Cadenza Owners Manual
- Kia Cadenza Service Manual
- Components and Components Location
- Alternator Schematic Diagrams
- Automatic Transaxle System
- New on site
- Most important about car

Copyright © 2026 www.kcadenzavg.com - 0.0215