Kia Cadenza: Cooling System / Radiator Repair procedures
Kia Cadenza YG 2016-2025 Service Manual / Engine Mechanical System / Cooling System / Radiator Repair procedures
| Removal and Installaton |
| 1. |
Remove the engine room under cover.
(Refer to Engine And Transaxle Assembly - “Engine Room Under Cover”) |
| 2. |
Drain the coolant.
(Refer to Cooling System - “Coolant”) |
| 3. |
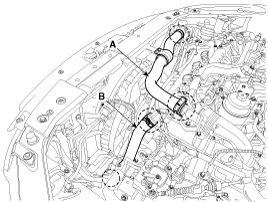
Remove the radiator upper hose (A) and lower hose (B).
|

| 4. |
Disconnect the ATF cooler hoses.
(Refer to Automatic Transaxle System - "Automatic Transaxle") |
| 5. |
Remove the radiator grill upper guard (A).
|

| 6. |
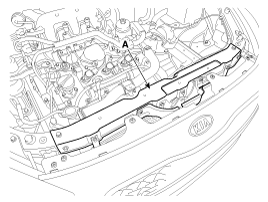
Disconnect the over flow hose (A).
|

| 7. |
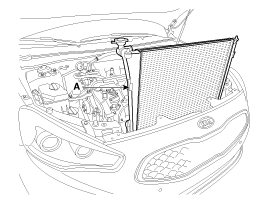
Remove the radiator upper mounting bracket assembly (A).
|
| 8. |
Separate the condenser from the radiator and then pull radiator (A) up and remove it from engine room.
|
| 9. |
Fill the radiator with coolant and check for leaks.
|
| Inspection |
Radiator Cap Testing
| 1. |
Remove the radiator cap, wet its seal with engine coolant, and then install it on a pressure tester.
|
| 2. |
Apply a pressure of 93.16 ~ 122.58kpa (0.95 ~ 1.25kg/cm², 13.51 ~ 17.78psi). |
| 3. |
Check for a drop in pressure. |
| 4. |
If the pressure drops, replace the cap. |
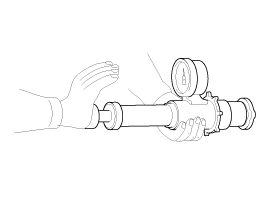
Radiator Leakage Test
| 1. |
Wait until engine is cool, then carefully remove the radiator
cap and fill the radiator with engine coolant, then install it on the
pressure tester. |
| 2. |
Apply a pressure tester to the radiator and apply a pressure of 93.16 ~ 122.58kpa (0.95 ~ 1.25kg/cm², 13.51 ~ 17.78psi). |
| 3. |
Inspect for engine coolant leaks and a drop in pressure. |
| 4. |
Remove the tester and reinstall the radiator cap.
|
 Radiator Components and Components Location
Components
1. Radiator2. Mounting insulator3. Radiator upper hose4. Radiator lower hose5. Coolant reservoir tank6. Over flow hose7. ATF cooler hose
...
 Reservoir Tank Repair procedures
Removal and Installation
1.
Disconnect the over flow hose (A), and then remove the resorvior tank (B).
Tightening torque:
3.9 ~ 5.9 N.m (0.4 ~ 0.6 kgf.m, 2.9 ~ 4.3 lb-ft)
2.
Installation ...
Other information:
Kia Cadenza YG 2016-2025 Service Manual: Shift Cable Components and Components Location
Components 1. Shift lever knob & Boots assembly2. Shift lever assembly3. Control cable assembly ...
Kia Cadenza YG 2016-2025 Service Manual: TPMS Sensor Description and Operation
Description 1. Mode (1) Configuration State • All sensors should be in the Low Line state. • In High Line configuration, sensor transmissions occur every 1 minute (nominal) and pressure is measured every 4 seconds. (2) Normal Delayed Auto State • This is H ...
Copyright © www.kcadenzavg.com 2017-2025
