Kia Cadenza: SRSCM / Seat Belt Buckle Switch (BS) Repair procedures
Kia Cadenza YG 2016-2025 Service Manual / Restraint / SRSCM / Seat Belt Buckle Switch (BS) Repair procedures
| Removal |
| 1. |
Disconnect the battery negative cable, and wait for at least three minutes before beginning work. |
| 2. |
Remove the front seat assembly.
(Refer to Body - "Front seat") |
| 3. |
Disconnect the connector mounting clip (A).
|
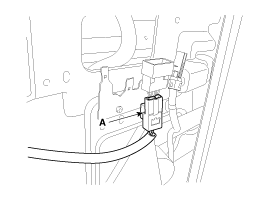
| 4. |
Loosen the seat belt buckle mounting bolt and remove the seat belt buckle switch (A).
|
| Installation |
Be sure to install the harness wires so they will not pinch or interfere with other parts.
|

| 1. |
Remove the ignition key from the vehicle. |
| 2. |
Disconnect the battery negative cable, and wait for at least three minutes before beginning work. |
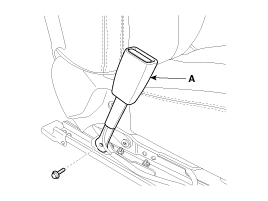
| 3. |
Install the seat belt buckle switch.
|
| 4. |
Install the front seat assembly.
(Refer to Body - "Front seat") |
| 5. |
Reconnect the battery negative cable. |
| 6. |
After installing the seat belt buckle switch, confirm proper system operation:
|

 Occupant Detection System (ODS) Description and Operation
Description
In order to make normal activation of airbag system, SRSCM
detects DTC(s) for the Passenger side Body Detection System. If the seat
is occupied, Body sensor detects how measuring el ...
Other information:
Kia Cadenza YG 2016-2025 Service Manual: Cooling Fan Specifications
Specifications ItemSpecificationFan typePULLERFan speed controlResistor (HI-LOW-OFF)Air flow rate [㎥/h (yd³/h)]2,650 (3,466) -10% min.Fan speed (rpm)1,890 ±10%Current (A)19.0 +10% max. ...
Kia Cadenza YG 2016-2025 Service Manual: Surround View Monitoring Switch Repair procedures
Removal 1. Disconnect the negative (-) battery terminal. 2. Remove the floor console upper cover. (Refer to Body - "Floor Console Assembly") 3. Disconnect the console upper cover connector (A). 4. Remove the cup holder assembly (A) after loosening the mounting screws. 5. Remove ...
Copyright © www.kcadenzavg.com 2017-2025
