Kia Cadenza: Automatic Transaxle Control System / Shift Cable Repair procedures
Kia Cadenza YG 2016-2025 Service Manual / Automatic Transaxle System / Automatic Transaxle Control System / Shift Cable Repair procedures
| Removal |
| 1. |
Remove the center console assembly.
(Refer to Body - "Console") |
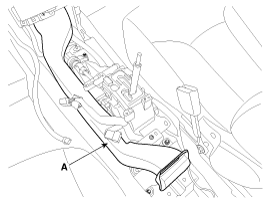
| 2. |
Remove the duct (A).
|
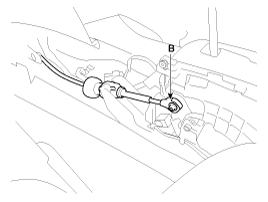
| 3. |
Remove the control cable (B).
|
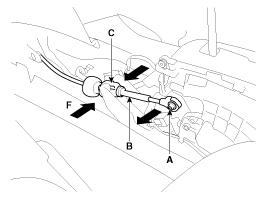
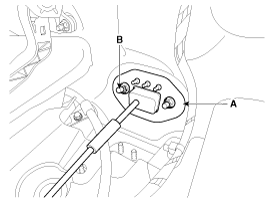
| 4. |
Disconnect the shift cable (A) and then remove the shift
cable (B) after pressing the shift cable socket (C) in the direction of
"F".
|

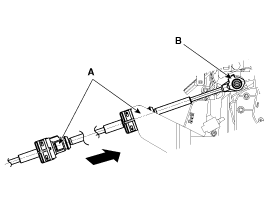
| 5. |
Remove the control cable assembly in the vehicle after removing the nuts (B) and the retainer (A).
|
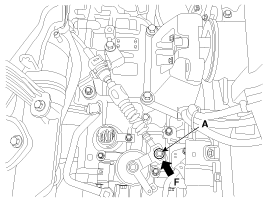
| 6. |
Remove the nut (C). |
| 7. |
Remove the control cable (B) after removing the nut (C) and the bolt (A).
|

| 8. |
Remove the control cable inside of cab.
|
| Installation |
| 1. |
Installation is the reverse of removal.
|
| Adjustment |
| Adjusting method for T/M control cable |
| 1. |
Make sure vehicle does not roll before setting room side
shift lever and Automatic Transaxle(AT) side manual control lever to "N"
position. |
| 2. |
Connect room side shift lever and control cable. |
| 3. |
Push cable to "F" direction shown to eliminate FREE PLAY. |
| 4. |
Tighten adjusting nut (A).
|
| 5. |
After adjusting, check to be sure that this part operates as
designed at each range of Automatic Transaxle(AT) side corresponding to
each position of room lever. |
 Shift Cable Components and Components Location
Components
1. Shift lever knob & Boots assembly2. Shift lever assembly3. Control cable assembly
...

Other information:
Kia Cadenza YG 2016-2025 Service Manual: Interior Trim Components and Components Location
Components 1. Front pillar trim2. Center pillar upper trim3. Center pillar lower trim4. Rear pillar trim5. Cowl side trim6. Front door scuff trim7. Rear door scuff trim8. Rear package tray trim ...
Kia Cadenza YG 2016-2025 Service Manual: Input Speed Sensor Repair procedures
Inspection 1. Turn ignition switch OFF. 2. Remove the battery and battery tray. (Refer to Engine Electrical System - "Battery") 3. Disconnect the solenoid valve connector (A). 4. Measure the resistance between power terminal (14) and signal terminal (8). Specification : Appro ...
Copyright © www.kcadenzavg.com 2017-2025
