Kia Cadenza YG: AVN System / AVN Head Unit Repair procedures
| Removal |
|

| 1. |
Disconnect the negative (-) battery terminal. |
| 2. |
Using the flat driver or remover, remove the center fascia lower panel (A).
|

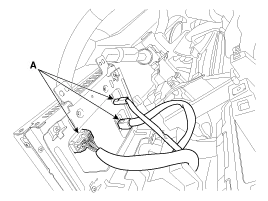
| 3. |
Disconnect the in-car hose (A) and connectors (B) from the center fascia panel.
|

| 4. |
Remove the AVN head unit (A) after loosening the mounting screws.
|

| 5. |
Remove the AVN head unit connectors and cables (A).
|

| 1. |
Disconnect the negative (-) battery terminal. |
| 2. |
Using the flat driver or remover, remove the center fascia lower panel (A).
|
| 3. |
Disconnect the in-car hose (A) and connectors (B) from the center fascia panel.
|
| 4. |
Using a screwdriver or remover, remove the crash pad garnish [RH] (A).
|

| 5. |
Using a screwdriver or remover, remove the crash pad center garnish (A).
|

| 6. |
Using a screwdriver or remover, remove the crash pad side cover [LH] (A).
|

| 7. |
After loosening the mounting screw, then remove the crash pad garnish [LH] (A).
|

| 8. |
After loosening the mounting screw, then remove the cluster fascia panel (A).
|

| 9. |
Remove the center fascia upper panel (A) after loosening the mounting screws.
|

| 10. |
Remove the monitor (A) after loosening the mounting screws.
|

| 11. |
Disconnect the monitor connectors (A).
|
| Installation |
| 1. |
Connect the AVN head unit connectors and cable. |
| 2. |
Install the AVN head unit. |
| 3. |
Install the center fascia panel. |
| 4. |
Connet the battery (-) terminal.
|
| 1. |
Install the monitor. |
| 2. |
Install the center fascia upper panel, cluster fascia panel,
crash pad garnish [LH], crash pad side cover, crash pad center garnish
and the crash pad garnish [RH]. |
| 3. |
Install the center fascia lower panel. |
| 4. |
Connect the negative (-) battery terminal. |
Components AVN (A/V & Navigation) Head Unit Connector Connector Pin Information No.Connector AConnector BConnector C1-MM CAN high-2Back view camera video--3Back view camera video ground--4Back view camera power groundSteer keyRS422 ground5SPDIF ground-RS422 Tx (+)6SPDIF (+)-RS422 Tx (-)7--RS422 Rx (-)8Illumination (+)AUX rightRS422 Rx (+)9R positionAUX groundLVDS PDN10-MIC (+)-11Camera battery (+)ACC-12Navigation voice (-)Battery (+)Ground13Navigation voice (+)MM CAN lowLVDS LOCK14Back view camera DETECT-EXT B/L ON15SPDIF (-)-RS485 Rx (+)16Door unlockSpeedRS485 Rx (-)17Illumination (-)Steer key groundRS485 ground18Antenna power-RS485 Tx (-)19 -RS485 Tx (+)20AUX DETECTTMU voice (+)21AUX leftTMU voice (-)22MIC (-)-23GroundGround24Ground-
Inspection 1. Troubleshooting for Speaker (1) Basic inspection of speaker Inspect the sound from speaker after verifying that the speaker mounting screws are removed and the wiring connector is connected to remove any possible vibration transmitted from body trims and surrounding parts.
Other information:
Kia Cadenza YG 2016-2021 Service Manual: Components and Components Location
C
Kia Cadenza YG 2016-2021 Service Manual: Troubleshooting
Troubleshooting Problem Symptoms Table Before replacing or repairing air conditioning components, first determine if the malfunction is due to the refrigerant charge, air flow or compressor. Use the table below to help you find the cause of the problem.
Categories
- Manuals Home
- Kia Cadenza Owners Manual
- Kia Cadenza Service Manual
- Body (Interior and Exterior)
- Emission Control System
- Body Electrical System
- New on site
- Most important about car
