Kia Cadenza: Engine Control System / Crankshaft Position Sensor (CKPS) Repair procedures
Kia Cadenza YG 2016-2025 Service Manual / Engine Control / Fuel System / Engine Control System / Crankshaft Position Sensor (CKPS) Repair procedures
| Inspection |
| 1. |
Check the signal waveform of the CMPS and CKPS using the GDS.
|
| Removal |
| 1. |
Turn the ignition switch OFF and disconnect the battery negative (-) cable. |
| 2. |
Remove the air cleaner assembly.
(Refer to Engine Mechanical System - "Air Cleaner") |
| 3. |
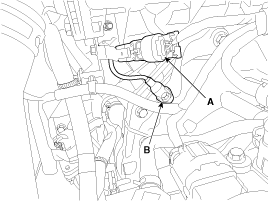
Disconnect the crankshaft position sensor connector (A). |
| 4. |
Remove the installation bolt (B), and then vertically remove the sensor from the transaxle housing.
|
| Installation |
|
|
|
| 1. |
Install in the reverse order of removal.
|
 Crankshaft Position Sensor (CKPS) Schematic Diagrams
Circuit Diagram
...
 Camshaft Position Sensor (CMPS) Description and Operation
Description
Camshaft Position Sensor (CMPS) is a hall sensor and detects the camshaft position by using a hall element.
It is related with Crankshaft Position Sensor (CKPS) and
detects the pisto ...
Other information:
Kia Cadenza YG 2016-2025 Owners Manual: Automatic climate control system
To defog inside windshield 1. Set the fan speed to the desired position. 2. Select desired temperature. 3. Press the defroster button (). 4. The outside (fresh) air position will be selected automatically and the air conditioning will turn on according to the detected ambient tempera ...
Kia Cadenza YG 2016-2025 Service Manual: Console Repair procedures
Replacement Floor Console Replacement • When prying with a flat-tip screwdriver, wrap it with protective tape, and apply protective tape around the related parts, to prevent damage. • Put on gloves to protect your hands. 1. Using a scr ...
Copyright © www.kcadenzavg.com 2017-2025


