Kia Cadenza YG: Exterior / Hood Repair procedures
| Replacement |
|

| 1. |
Using a screwdriver, lift the socket clips (A) up slightly on both ends of the lifter (B).
|

| 2. |
After loosening the hood hinge (A) mounting bolts, remove the hood panel (B). |
| 3. |
Remove the washer nozzle (C).
|

| 4. |
Installation is the reverse of removal.
|
| 1. |
Using a clip remover, detach the clips, and remove the hood insulator pad (A).
|


| 2. |
Installation is the reverse of removal.
|
| 1. |
Using a screwdriver (A), lift the socket clips (B) up
slightly on both ends of the lifter (C), and then remove the lifter from
the bracket (D).
|

| 2. |
Installation is the reverse of removal. |
| 1. |
Detach the clips, then remove the hood seal weatherstrip (A).
|

| 2. |
Installation is the reverse of removal.
|
| 1. |
Remove the glue on end of both sides before removing the hood weatherstrip (A).
|

| 2. |
Installation is the reverse of removal. |
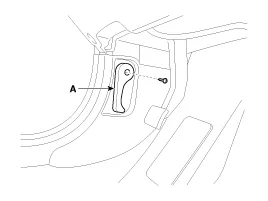
| 1. |
After loosening the mounting screw, then remove the hood release handle (A).
|
| 2. |
Installation is the reverse of removal.
|
| 1. |
Remove the front bumper cover.
(Refer to the BD group - "Front Bumper") |
| 2. |
Detach the clips, then remove hood latch cover (A).
|

| 3. |
Remove the hood latch (A) mounting bolts.
|

| 4. |
Disconnect the hood latch cable (A) and remove the hood latch (B).
|

| 5. |
Installation is the reverse of removal.
|
| Adjustment |
| 1. |
After loosening the hinge (A) mounting bolt, adjust the hood (B) by moving it up or down, or right or left. |
| 2. |
Adjust the hood height by turning the hood overslam bumpers (C). |
| 3. |
After loosening the hood latch (D) mounting bolts, adjust the latch by moving it up or down, or right or left.
|

Replacement • Be careful not to damage the fender and body. • When removing the clips, use a clip remover.
Replacement Trunk Lid Assembley Replacement • When removing and installing the trunk lid, an assistant is necessary.
Other information:
Kia Cadenza YG 2016-2021 Service Manual: Schematic Diagrams
Circuit Diagram SVM System Input/Output 1. Camera input ItemSpecificationLens angle of view190 degreesAngle of viewHorizontal186 degreesVertical135 degreesFunctionProvides the original image of the wide angle image (no additional function)Application locationSame camera applied to the front, rear, left and right 2.
Kia Cadenza YG 2016-2021 Service Manual: Description and Operation
System Overview RPAS (Rear Parking Assist System) is an electronic driving aid that warns the driver to be cautious while parking or in low speed environments. The sensor uses ultrasonic waves to detect objects within proximity of the vehicle.
Categories
- Manuals Home
- Kia Cadenza Owners Manual
- Kia Cadenza Service Manual
- Transaxle Control Module (TCM) Repair procedures
- Engine Mechanical System
- Specifications
- New on site
- Most important about car
