Kia Cadenza YG: Seat Electrical / Air Ventilation Seat Repair procedures
Kia Cadenza YG 2016-2021 Service Manual / Body Electrical System / Seat Electrical / Air Ventilation Seat Repair procedures
| Removal |
[Front Seat]
| 1. |
Remove the front seat assembly.
(Refer to Body - "Front Seat") |
| 2. |
Remove the seat back cover and cushion cover.
(Refer to Body - "Front Seat") |
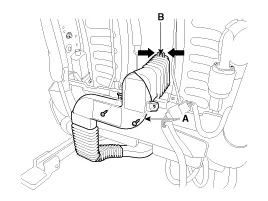
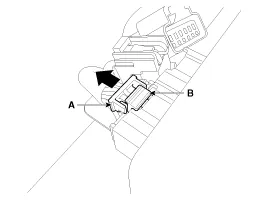
| 3. |
Remove the ventilation duct (A) after loosening screws and removing fixing hook (B).
|
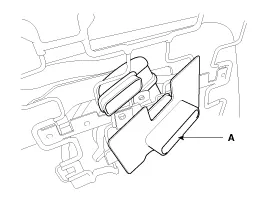
| 4. |
Remove the air ventilation panel (A) and fixing clip (B) from seat cushion.
|

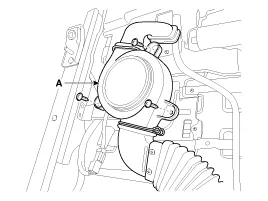
| 5. |
Remove the climate blower and duct (A) after loosening the fixing clips and screws.
|
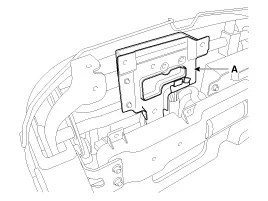
| 6. |
Remove the climate control unit (A) after loosening the mounting screws.
|


| Installation |
[Front Seat]
| 1. |
Install the connectors and air ventilation control unit. |
| 2. |
Install the air ventilation duct and blower. |
| 3. |
Install the seat back cover. |
| 4. |
Install the seat assembly and seat track cover. |
Description Using the blows power of FAN on seat, remove the moisture, sweat and warmth from occupants and surface of seats. It inhales the indoor air through the blower installed at the seat cushion lower part, and supplies the air into the seat cushion and the seat back through the duct.
Other information:
Kia Cadenza YG 2016-2021 Service Manual: Auto Head lamp leveling Unit Repair procedures
Removal Height Sensor 1. Remove the height sensor connector (A). 2. Loosen the mounting bolts(Body: 2EA, chassis: 1EA) from height sensor bracket. Tightening torque : 3 ~ 5N.m (30 ~ 50kgf.m, 2.21 ~ 3.68lb-ft) 3. Remove the height sensor.
Kia Cadenza YG 2016-2021 Service Manual: Pantoscopic Camera Components and Components Location
C
Categories
- Manuals Home
- Kia Cadenza Owners Manual
- Kia Cadenza Service Manual
- Body Electrical System
- Timing Chain Repair procedures
- Suspension System
- New on site
- Most important about car

Copyright © 2026 www.kcadenzavg.com - 0.0236