Kia Cadenza YG: Engine Control System / Barometric Pressure Sensor (BPS) Repair procedures
Kia Cadenza YG 2016-2021 Service Manual / Engine Control / Fuel System / Engine Control System / Barometric Pressure Sensor (BPS) Repair procedures
| Inspection |
| 1. |
Connect the GDS on the Data Link Connector (DLC). |
| 2. |
Measure the output voltage of the BPS at idle and IG ON.
|
| Removal |
| 1. |
Turn the ignition switch OFF and disconnect the battery negative (-) cable. |
| 2. |
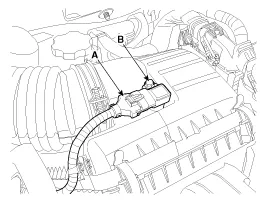
Disconnect the barometric pressure sensor connector (A). |
| 3. |
Remove the installation bolt (B), and then remove the sensor from the air cleaner assembly.
|
| Installation |
|

|
| 1. |
Install in the reverse order of removal.
|
Circuit Diagram
Description Intake Air Temperature Sensor (IATS) is included inside Barometric Pressure Sensor (BPS) and detects the intake air temperature. To calculate precise air quantity, correction of the air temperature is needed because air density varies according to the temperature.
Other information:
Kia Cadenza YG 2016-2021 Service Manual: Components and Components Location
C
Kia Cadenza YG 2016-2021 Service Manual: Repair procedures
Refrigerant System Service Basics Refrigerant Recovery Use only service equipment that is U.L-listed and is certified to meet the requirements of SAE J2210 to remove HFC-134a(R-134a) from the air conditioning system. – Air conditioning refrigerant or lubricant vapor can irritate your eyes, nose, or th
Categories
- Manuals Home
- Kia Cadenza Owners Manual
- Kia Cadenza Service Manual
- Steering System
- Automatic Transaxle System
- Engine Control / Fuel System
- New on site
- Most important about car

Copyright © 2026 www.kcadenzavg.com - 0.0212