
Kia Cadenza YG: Cooling System / Cooling Fan Repair procedures
Kia Cadenza YG 2016-2021 Service Manual / Engine Mechanical System / Cooling System / Cooling Fan Repair procedures
| Removal and Installaton |
| Cooling Fan Assembly |
| 1. |
Disconnect the battery negative terminal. |
| 2. |
Remove the air duct (A).
|

| 3. |
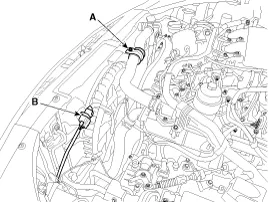
3. Loosen the upper hose fixing bolt (A), and disconnect the fan motor connector (B).
|

| 4. |
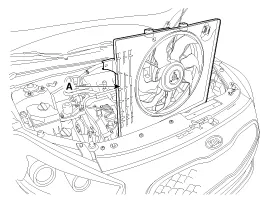
Remove cooling fan assembly (A).
|
| 5. |
Install in the reverse order of removal. |
| Inspection |
| 1. |
Disconnect the fan motor connector from the resistor. |
| 2. |
Connect the battery voltage to the "+" terminal and ground to "-" terminal. |
| 3. |
Check the cooling fan motor operates well. |
Circuit Diagram
Components 1. Radiator2. Mounting insulator3. Radiator upper hose4. Radiator lower hose5. Coolant reservoir tank6. Over flow hose7. ATF cooler hose
Other information:
Kia Cadenza YG 2016-2021 Service Manual: Components and Components Location
C
Kia Cadenza YG 2016-2021 Service Manual: A/C Pressure Transducer Description and Operation
Description A/C pressure transducer convert the pressure value of high pressure line into voltage value after measure it. By converted voltage value, engine ECU controls cooling fan by operating it high speed or low speed. Engine ECU stop the operation of compressor when the temperature of refrigerant line is so high or so low irregularl
Categories
- Manuals Home
- Kia Cadenza Owners Manual
- Kia Cadenza Service Manual
- Engine Electrical System
- Engine Control / Fuel System
- Emission Control System
- New on site
- Most important about car

Copyright © 2026 www.kcadenzavg.com - 0.0258