In "DISARM" state, no vehicle start inhibition. So, when
door, hood, or Tailgate is opened, there is no alarm sound and flashing.
2)
If the battery is disconnected while the state is not "ARM/ARMWAIT/ALARM/REARM", B/A state is set to "DISARM" state.
ARMWAIT
1)
In "ARMWAIT" state, when timer “30sec." is running, if this timer reaches “30sec”, state transits to "ARM" state.
2)
If the battery is disconnected while the state is "ARMWAIT",
B/A state is set to "ARMWAIT" state and timer "30sec" is restarted.
※ Remark: On Smart key system, it works the same way with passive lock
B/A State
Description
AUTO LOCK TIMER 1
1)
In "AUTOLOCKTIMER1" state, timer “30sec."is running. If
this timer expired, the auto lock command is generated “Lock
command”.
2)
When “Lock command” operated, All Door changed lock and closed then B/A state changes “AUTOLOCKTIMER1” to “ARMWAIT
3)
In "AUTOLOCKTIMER1" state, Security Indicator keeps
blinking. In "AUTOLOCKTIMER1" state, timer “30sec."is running. If this
timer expired, the auto lock command is generated “Lock command”.
When “Lock command” operated, All Door changed lock and closed then
B/A state changes “AUTOLOCKTIMER1” to “ARMWAIT
※ Remark: On Smart key system, it works the same way with passive unlock
B/A State
Description
AUTO LOCK TIMER 2
1)
In "AUTOLOCKTIMER2" state, when timer “30sec."is running,
if this timer expired, the auto lock command is generated “Lock
command”.
2)
All doors are Locked, Hood is closed and Tailgate is closed
when “Lock command” operated, then B/A state changes
to“AUTOLOCKTIMER2” when “Lock Command” generated with Hood open.
3)
When “Unlock command” operated on the condition of All
Door closed and Hood open, B/A state changes to “AUTOLOCKTIMER2”.
※ Remark: On Smart key system, it works the same way with passive unlock
B/A State
Description
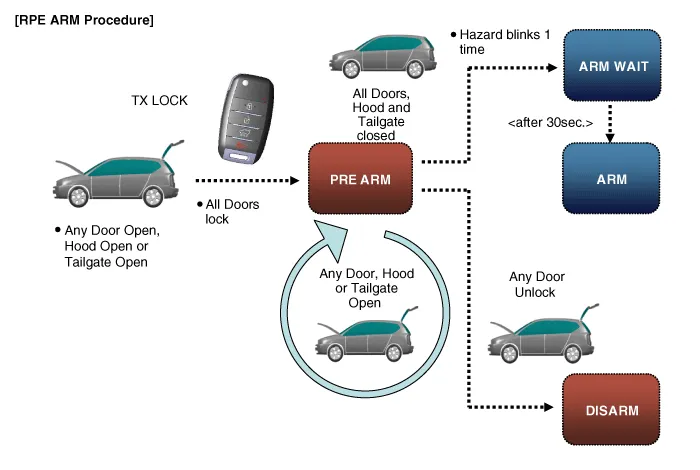
PRE ARM
1)
The "PREARM" state is when user try to change to arm but
pre-condition are not satisfied (door open, tailgate open, or hood
open).
2)
B/A state changes to “PREARM” when TX Lock command occurs with any door Open, Hood or Tailgate Open.
3)
B/A state changes to “PREARM” when “30sec.” timer expired in“AUTOLOCKTIMER2”with Hood or Tailgate Open
4)
The “PREAMR” state changes to “ARM” when all doors closed, All doors locked and Hood and Tailgate closed.
5)
The “PREAMR” state changes to “DISARM” when Any Door Unlock
B/A State
Description
RE ARM
1)
In "REARM" state, if the vehicle intrusion is detected,
flashing and sound is restarted, again and state transits to "ALARM"
state.
2)
B/A state changes to “REARM” after the timer “27sec.” expires in “ALARM” state with All doors closed and lock.
B/A State
Description
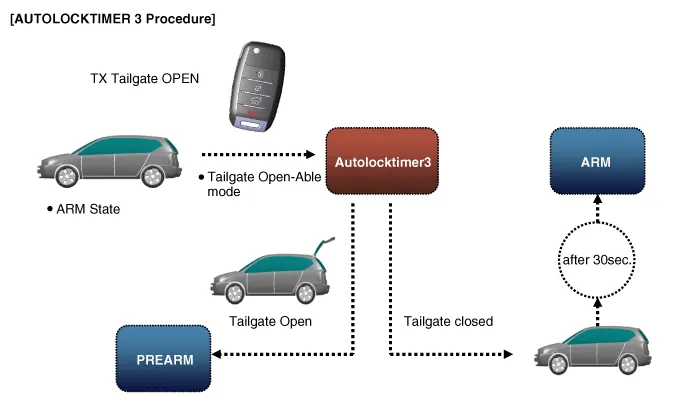
AUTOLOCK TIMER3
1)
B/A state changes to “AUTOLockTIMER3”, when TX-Tailgate command operated.
2)
B/A state changes “AUTOLOCKTIMER3” to “ARMWAIT”, when the “30sec.” timer expires with all doors lock and closed.
3)
B/A state changes “AUTOLOCKTIMER3” to “DISARM”, when any door open.
4)
In "AUTOLOCKTIMER3" state, timer “30sec.“ timer is
running. If this timer expired, state transits to "PREARM" state with
Tailgate Open.
Removal
1.
Disconnect the negative (-) battery terminal.
2.
Using a screwdriver or remover, remove the crash pad side cover (A).
[RH]
3.
Disconnect the stopper (B) from the glove box (A).
4.
Disconnect the air damper (A) from the glove box (B).
Inspection
Self diagnosis
1.
Self-diagnosis process
2.
How to read self-diagnostic code.
After the display panel flickers three times every 0.5
second, the corresponding fault code flickers on the setup temperature
display panel every 0.