Kia Cadenza YG: Hydraulic System / Fluid Repair procedures
| Service Adjustment Procedure |
| Oil level Check |
When checking the oil level, be careful not to enter dust, foreign matters, etc. from fill hole.
|

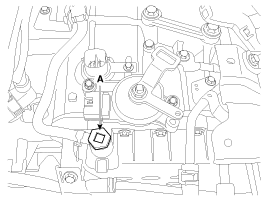
| 1. |
Remove the eyebolt (A).
|
| 2. |
Add ATF SP-IV 700cc to the ATF injection hole.
|
| 3. |
Start the engine. (Don’t step on brake and accelerator simultaneously.) |
| 4. |
Confirm that the temperature of the Automatic Transaxle(AT) Oil Temperature Sensor(OTS) is 50~60°C(122~140°F) with the GDS. |
| 5. |
Shift the select lever slowly from “P” to “D”, then “D” to “P” and repeat one more at idle.
|
| 6. |
Lift the vehicle, then remove the oil level plug (A) from the valve body cover.
|

| 7. |
If the oil flows out of the overflow plug in thin steady stream, the oil level is correct.
Then finish the procedure and tighten the oil plug.
|

| 8. |
Put down the vehicle with the lift and then tighten the eyebolt. |
| Replacement |
| 1. |
Remove the drain plug (A) and drain the ATF totally. Reinstall the drain plug.
|

| 2. |
Fill the oil about 5 liters through eyebolt. |
| 3. |
Check the oil level.
(Refer to Hydraulic System - "Fluid") |
Components Location 1. Injection hole(eyebolt)2. Oil level plug3. Oil drain plug
Description The valve body is essential to automatic transaxle control and consists of various valves used to control the oil feed from the oil pump.
Other information:
Kia Cadenza YG 2016-2021 Service Manual: Description and Operation
Description Surround View Monitoring System (SVM) is the system that allows video monitoring of 360 degrees around the vehicle. The system includes 4 ultra optical camera mounted around the vehicle (front, both sides, rear). The video from these cameras are applied with distortion compensation, time point conversion, and video merging
Kia Cadenza YG 2016-2021 Service Manual: Antenna Coil Repair procedures
Removal 1. Disconnect the negative (-) battery terminal. 2. Remove the crash pad lower panel. (Refer to Body - "Crash Pad") 3. Disconnect the 6P connector (B) of the coil antenna and then remove the coil antenna (A) after loosening the screw.
Categories
- Manuals Home
- Kia Cadenza Owners Manual
- Kia Cadenza Service Manual
- Alternator Schematic Diagrams
- Rail Pressure Sensor (RPS) Schematic Diagrams
- Suspension System
- New on site
- Most important about car
