Kia Cadenza YG: Front Suspension System / Front Strut Assembly Repair procedures
| Replacement |
| 1. |
Remove the front wheel & tire.
|

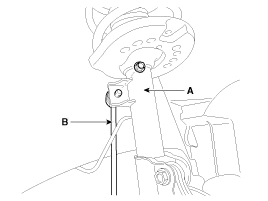
| 2. |
Remove the brake hose (A) & wheel speed sensor bracket (B) from the front strut assembly by loosening mounting bolts.
|

| 3. |
Disconnect the stabilizer link (B) with the front strut assembly (A) after loosening the nut.
|
| 4. |
Disconnect the front strut assembly (A) with the knuckle by loosening the bolt & nut.
|

| 5. |
Remove the front strut assembly and than loosen the strut mounting nuts (A).
|

| 6. |
Installation is the reverse of removal. |
| Disassembly |
| 1. |
Compress the coil spring with a SST (09546-26000). Do not compress the spring more than necessary. |
| 2. |
Loosen the self-locking nut.
|

| Inspection |
| 1. |
Check the strut bearing for wear and damage. |
| 2. |
Check the spring upper and lower seat for damage and deterioration. |
| 3. |
Compress and extend the piston rod (A) and check that there is no abnormal resistance or unusual sound during operation.
|

Components 1. Insulator cap2. Upper locking nut3. Self locking nut4. Insulator 5. Strut bearing6. Spring upper pad7. Strut dust cover & Bumper rubber8.
Replacement 1. Remove the front wheel & tire. Tightening torque: 88.3 ~ 107.9N.m (9.0 ~ 11.0kgf.m, 65.1 ~ 79.6lb-ft) Be careful not to damage to the hub bolts when removing the front wheel & tire.
Other information:
Kia Cadenza YG 2016-2021 Service Manual: Specifications
Specification ItemSpecificationUltrasonic sensorVoltage ratingDC 12 VDetecting range30 cm ~ 120 cmOperation voltageDC 9 ~ 16 VOperation currentMAX 300 mAOperation temperature-30°C ~ +80°C (-22°C ~ +176°C)Operation frequency48 ± 5 KHzEffective operating velocity10 KPH (6.
Kia Cadenza YG 2016-2021 Service Manual: Description and Operation
Description System Overview The System offers the following features: – Human / machine interface through a 1-stage button, for terminal switching and engine start. – Control of external relays for ACC / IGN1 / IGN2 terminal switching and STARTER, without use of mechanical ignition switch.
Categories
- Manuals Home
- Kia Cadenza Owners Manual
- Kia Cadenza Service Manual
- Timing Chain Repair procedures
- Rail Pressure Sensor (RPS) Schematic Diagrams
- Components and Components Location
- New on site
- Most important about car
