
Kia Cadenza YG: Engine Control System / Manifold Absolute Pressure Sensor (MAPS) Repair procedures
Kia Cadenza YG 2016-2021 Service Manual / Engine Control / Fuel System / Engine Control System / Manifold Absolute Pressure Sensor (MAPS) Repair procedures
| Inspection |
| 1. |
Connect the GDS on the Data Link Connector (DLC). |
| 2. |
Measure the output voltage of the MAPS at idle and IG ON.
|
| Removal |
| 1. |
Turn the ignition switch OFF and disconnect the battery negative (-) cable. |
| 2. |
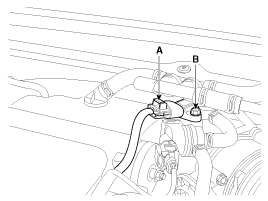
Disconnect the manifold absolute pressure sensor connector (A). |
| 3. |
Remove the installation bolt (B), and then vertically remove the sensor from the surge tank.
|
| Installation |
|

|
| 1. |
Install in the reverse order of removal.
|
Circuit Diagram
Description Engine Coolant Temperature Sensor (ECTS) is located in the engine coolant passage of the cylinder head for detecting the engine coolant temperature.
Categories
- Manuals Home
- Kia Cadenza Owners Manual
- Kia Cadenza Service Manual
- Engine Electrical System
- Specifications
- Schematic Diagrams
- New on site
- Most important about car

Copyright © 2026 www.kcadenzavg.com - 0.0231