
Kia Cadenza YG: Power Windows / Power Window Motor Repair procedures
Kia Cadenza YG 2016-2021 Service Manual / Body Electrical System / Power Windows / Power Window Motor Repair procedures
| Inspection |
Front Power Window Motor Inspection
| 1. |
Remove the front door trim panel.
(Refer to Body - "Front Door") |
| 2. |
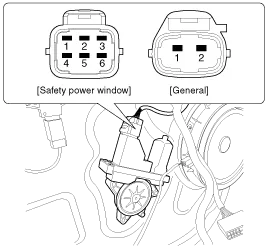
Disconnect the connector from the motor.
|
| 3. |
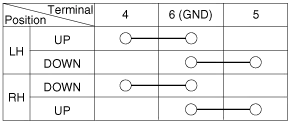
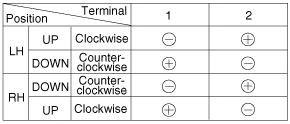
Connect the terminal No. 1 and No. 2 to battery voltage (12V)
and terminal No. 6 to battery (-). And then check that the motor
operates smoothly when connecting the terminals below.
If the operation is abnormal, replace the motor.
[Safety Power Window]
|
| 4. |
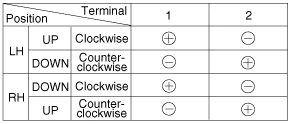
Connect the motor terminals directly to battery voltage (12V)
and check that the motor operates smoothly. Next, reverse the polarity
and check that the motor operates smoothly in the reverse direction. If
the operation is abnormal, replace the motor.
[General]
|
Rear Power Window Motor Inspection
| 1. |
Remove the rear door trim panel.
(Refer to Body - "Rear Door") |
| 2. |
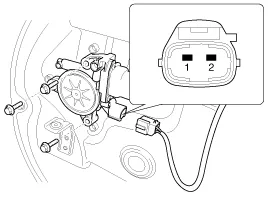
Disconnect the 2P connector from the motor.
|
| 3. |
Connect the motor terminals directly to battery voltage (12V)
and check that the motor operates smoothly. Next, reverse the polarity
and check that the motor operates smoothly in the reverse direction. If
the operation is abnormal, replace the motor.
|
Circuit Diagram
Circuit Diagram Driver Power Window Switch (1) Driver Power Window Switch (2) Passenger Power Window Swich Rear Power Window Swich
Other information:
Kia Cadenza YG 2016-2021 Service Manual: Condenser Repair procedures
Inspection 1. Check the condenser fins for clogging and damage. If clogged, clean them with water, and blow them with compressed air. If bent, gently bend them using a screwdriver or pliers. 2. Check the condenser connections for leakage, and repair or replace it, if required.
Kia Cadenza YG 2016-2021 Service Manual: Blower Motor Repair procedures
Inspection 1. Connect the battery voltage and check the blower motor rotation. 2. If the blower motor voltage is not operated well, substitute with a known-good blower motor and check for proper operation. 3. If the problem is corrected, replace the blower motor.
Categories
- Manuals Home
- Kia Cadenza Owners Manual
- Kia Cadenza Service Manual
- Brake System
- Body Control Module (BCM) Description and Operation
- Crankshaft Damper Pulley Components and Components Location
- New on site
- Most important about car

Copyright © 2026 www.kcadenzavg.com - 0.0238