Kia Cadenza YG: Cooling System / Radiator Repair procedures
| Removal and Installaton |
| 1. |
Remove the engine room under cover.
(Refer to Engine And Transaxle Assembly - “Engine Room Under Cover”) |
| 2. |
Drain the coolant.
(Refer to Cooling System - “Coolant”) |
| 3. |
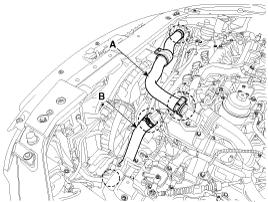
Remove the radiator upper hose (A) and lower hose (B).
|

| 4. |
Disconnect the ATF cooler hoses.
(Refer to Automatic Transaxle System - "Automatic Transaxle") |
| 5. |
Remove the radiator grill upper guard (A).
|

| 6. |
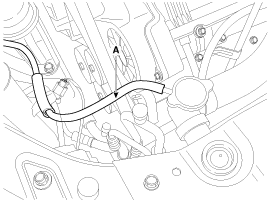
Disconnect the over flow hose (A).
|
| 7. |
Remove the radiator upper mounting bracket assembly (A).
|

| 8. |
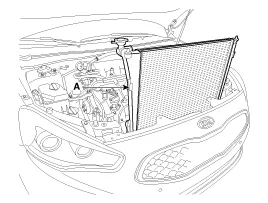
Separate the condenser from the radiator and then pull radiator (A) up and remove it from engine room.
|
| 9. |
Fill the radiator with coolant and check for leaks.
|
| Inspection |
| 1. |
Remove the radiator cap, wet its seal with engine coolant, and then install it on a pressure tester.
|
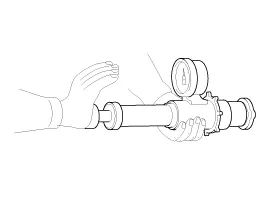
| 2. |
Apply a pressure of 93.16 ~ 122.58kpa (0.95 ~ 1.25kg/cm², 13.51 ~ 17.78psi). |
| 3. |
Check for a drop in pressure. |
| 4. |
If the pressure drops, replace the cap. |
| 1. |
Wait until engine is cool, then carefully remove the radiator
cap and fill the radiator with engine coolant, then install it on the
pressure tester. |
| 2. |
Apply a pressure tester to the radiator and apply a pressure of 93.16 ~ 122.58kpa (0.95 ~ 1.25kg/cm², 13.51 ~ 17.78psi). |
| 3. |
Inspect for engine coolant leaks and a drop in pressure. |
| 4. |
Remove the tester and reinstall the radiator cap.
|
Components 1. Radiator2. Mounting insulator3. Radiator upper hose4. Radiator lower hose5. Coolant reservoir tank6. Over flow hose7. ATF cooler hose
Removal and Installation 1. Disconnect the over flow hose (A), and then remove the resorvior tank (B). Tightening torque: 3.9 ~ 5.9 N.m (0.4 ~ 0.
Other information:
Kia Cadenza YG 2016-2021 Service Manual: Surround View Monitoring Switch Repair procedures
Removal 1. Disconnect the negative (-) battery terminal. 2. Remove the floor console upper cover. (Refer to Body - "Floor Console Assembly") 3. Disconnect the console upper cover connector (A). 4. Remove the cup holder assembly (A) after loosening the mounting screws.
Kia Cadenza YG 2016-2021 Service Manual: Description and Operation
System Overview RPAS (Rear Parking Assist System) is an electronic driving aid that warns the driver to be cautious while parking or in low speed environments. The sensor uses ultrasonic waves to detect objects within proximity of the vehicle.
Categories
- Manuals Home
- Kia Cadenza Owners Manual
- Kia Cadenza Service Manual
- Restraint
- Engine Control / Fuel System
- Emission Control System
- New on site
- Most important about car
