
Kia Cadenza YG: Seat Electrical / Seat Heater Repair procedures
Kia Cadenza YG 2016-2021 Service Manual / Body Electrical System / Seat Electrical / Seat Heater Repair procedures
| Inspection |
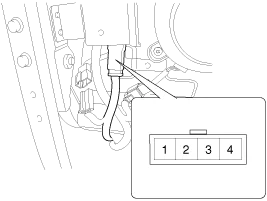
First Seat Heater
| 1. |
Check for continuity and measure the resistance between No.1 and NO.4 terminals.
|
| 2. |
Operate the seat heater after connecting the connector, and
then check the thermostat by measuring the temperature of seat surface.
|
| 3. |
Check for continuity between the terminals after disconnecting the connector. |
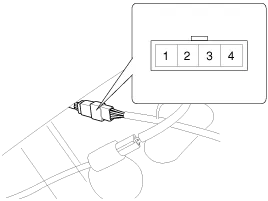
2nd Seat Heater
| 1. |
Check for continuity and measure the resistance between No.1 and NO.4 terminals.
|
| 2. |
Operate the seat warmer after connecting the 3P connector,
and then check the thermostat by measuring the temperature of seat
surface.
|
Circuit Diagram
Circuit Diagram
Other information:
Kia Cadenza YG 2016-2021 Service Manual: Receiver-Drier Repair procedures
Replacement 1. Remove the condenser, and then remove the bottom cap (B) with L wrench (A) from the condenser. Tightening torque : 9.8~14.7N.m (1.0~1.5kgf.m, 7.2~10.8 lb-ft) 2. Remove the desiccant (A) from condenser using a long nose plier.
Kia Cadenza YG 2016-2021 Service Manual: Photo Sensor Repair procedures
Inspection 1. Ignition "ON" 2. Using the scan tool. 3. Emit intensive light toward photo sensor using a lamp, and check the output voltage change. 4. The voltage will rise with higher intensive light and reduce with lower intensive light.
Categories
- Manuals Home
- Kia Cadenza Owners Manual
- Kia Cadenza Service Manual
- Engine Electrical System
- Timing Chain Repair procedures
- Crankshaft Damper Pulley Components and Components Location
- New on site
- Most important about car

Copyright © 2026 www.kcadenzavg.com - 0.028