Kia Cadenza YG: Cooling System / Thermostat Repair procedures
Kia Cadenza YG 2016-2021 Service Manual / Engine Mechanical System / Cooling System / Thermostat Repair procedures
| Removal |
Removal of the thermostat would have an adverse effect,
causing a lowering of cooling efficiency. Do not remove the thermostat,
even if the engine tends to overheat. |

| 1. |
Drain engine coolant so its level is below thermostat.
(Refer to Cooling System - "Coolant") |
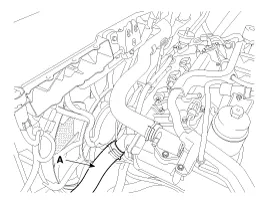
| 2. |
Disconnect the ratiator lower hose (A).
(Refer to Cooling System - "Radiator Hose") |
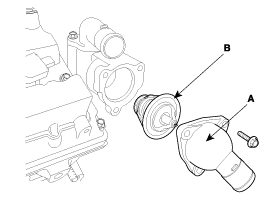
| 3. |
Remove the water inlet fitting (A) and the thermostat (B).
|
| Inspection |
| 1. |
Immerse thermostat in water heated to over 95°C (203°F), then heat for at least 3 minutes to check valve lift.
|

| 2. |
Check the valve opening temperature.
If the valve opening temperature is not as specified, replace the thermostat. |
| 3. |
Check the valve lift.
If the valve lift is not as specified, replace the thermostat. |
| Installation |
| 1. |
Place the thermostat in thermostat housing.
|
| 2. |
Install the water inlet fitting (A).
|
| 3. |
Connect the ratiator lower hose (A).
|
| 4. |
Install the ratiator upper hose.
(Refer to Cooling System - "Radiator Hose") |
| 5. |
Fill with engine coolant. |
| 6. |
Start engine and check for leaks. |
Components 1. Water temperature control assembly2. Thermostat3. Water inlet fitting pipe
Troubleshooting SymptomsPossible CausesRemedyCoolant leakage • From the thermostat gasket Check the mounting bolts • Check the torque of the mounting bolts • Retighten the bolts and check leakage again.
Other information:
Kia Cadenza YG 2016-2021 Service Manual: Adaptive Front Lighting System Description and Operation
Description AFLS Unit(ECU) AFLS located in Cockpit Module is provided information of vehicle (steering wheel signal,vehicle speed, inclination of vehicle). Based on provided information , it calculates algorithm and adjust Low beam of H/Lamp. It transmits driving information by using LIN protocol, it is operated in Fail-safe reaction mode
Kia Cadenza YG 2016-2021 Service Manual: Temperature Control Actuator Description and Operation
D
Categories
- Manuals Home
- Kia Cadenza Owners Manual
- Kia Cadenza Service Manual
- Timing Chain Repair procedures
- Engine Mechanical System
- Steering System
- New on site
- Most important about car

Copyright © 2026 www.kcadenzavg.com - 0.0238