Kia Cadenza YG: Cooling System / Water pump Repair procedures
| Removal |
| 1. |
Remove the engine room under cover.
(Refer to Engine And Transaxle Assembly - "Engine Room Under Cover") |
| 2. |
Drain the coolant.
(Refer to Cooling System - "Coolant") |
| 3. |
Remove the drive belt.
(Refer to Timing System - "Drive Belt") |
| 4. |
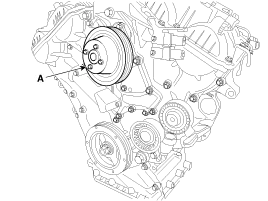
Remove the water pump pulley (A).
|
| 5. |
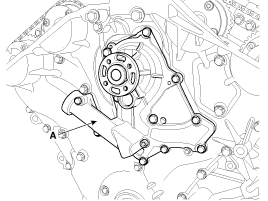
Remove the water pump (A) and gaskets (B).
|
| Inspection |
| 1. |
Check each part for cracks, damage or wear, and replace the coolant pump assembly if necessary. |
| 2. |
Check the bearing for damage, abnormal noise and sluggish rotation, and replace the coolant pump assembly if necessary. |
| 3. |
Check for coolant leakage. If coolant leaks from hole, the seal is defective. Replace the coolant pump assembly.
|

| Installation |
| 1. |
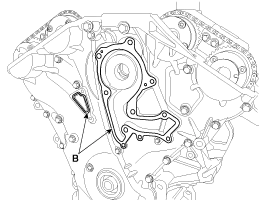
Install the water pump (A) with the new gaskets (B).
|
| 2. |
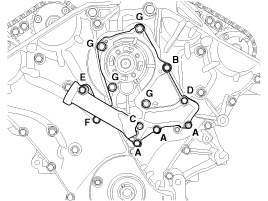
Install the water pump pulley (A).
|
| 3. |
Install in the reverse order of removal. |
| 4. |
Fill the radiator with coolant and check for leaks.
(Refer to Cooling System - "Coolant") |
Components 1. Water pump pulley2. Water pump 3. Water pump gasket
Troubleshooting SymptomsPossible CausesRemedyCoolant leakage • From the bleed hole of the water pump Visually check • Check leaks after about ten-minute warming up.
Other information:
Kia Cadenza YG 2016-2021 Service Manual: Evaporator unit Repair procedures
Inspection 1. Ignition "OFF". 2. Disconnect evaporator temperature sensor. 3. Using the multi-tester, Measure resistance between terminal "1" and "2" of evaporator temperature sensor. Specification Evaporator coretemperature [°C(°F)]Resistance[KΩ]Voltage[V]-20(-4)70.
Kia Cadenza YG 2016-2021 Service Manual: Auto defoging actuator Repair procedures
Inspection 1. Ignition "OFF”. 2. Disconnect the connector of auto defog control actuator. 3. Verify that the auto defog control actuator operates to the defrost ON mode when connecting 12V to the terminal 3 and grounding terminal 7. 4.
Categories
- Manuals Home
- Kia Cadenza Owners Manual
- Kia Cadenza Service Manual
- General Information
- Rail Pressure Sensor (RPS) Schematic Diagrams
- Schematic Diagrams
- New on site
- Most important about car
