
Kia Cadenza YG: Cooling System / Water Temperature Control Assembly Repair procedures
Kia Cadenza YG 2016-2021 Service Manual / Engine Mechanical System / Cooling System / Water Temperature Control Assembly Repair procedures
| Removal and Installation |
|

|

Water Temperature Control Assembly
| 1. |
Disconnect the battery negative terminal. |
| 2. |
Remove the engine room under cover.
(Refer to Engine And Transaxle Assembly - "Engine Room Under Cover") |
| 3. |
Loosen the drain plug and drain the engine coolant.
(Refer to Cooling System - "Coolant") |
| 4. |
Remove the air cleaner assembly.
(Refer to Intake and Exhaust System - "Air cleaner") |
| 5. |
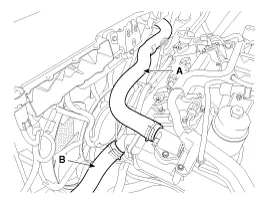
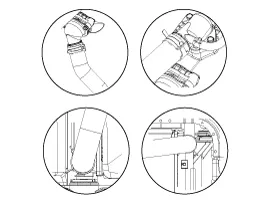
Disconnect the radiator upper hose (A) and lower hose (B).
|
| 6. |
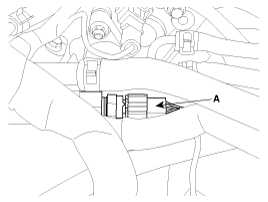
Disconnect the WTS & gauge unit connector (A).
|
| 7. |
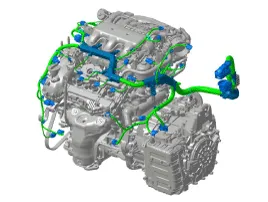
Separate the engine wiring protector mounted on the water temperature control assembly.
|
| 8. |
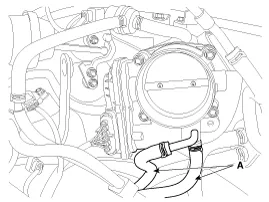
Disconnect the throttle body coolant hoses (A).
|
| 9. |
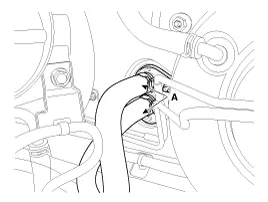
Disconnect the heater hoses (A).
|
| 10. |
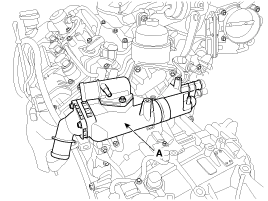
Remove the water temperature control assembly (A).
|
| 11. |
Install in the reverse order of removal. |
| 12. |
Fill the radiator with coolant and check for leaks.
(Refer to Cooling System - "Coolant") |
|
Water Center Pipe
| 1. |
Remove the intake manifold.
(Refer to Intake And Exhaust System - "Intake Manifold") |
| 2. |
Remove the water temperature control assembly.
(Refer to Cooling System - "Water Temperature Control Assembly") |
| 3. |
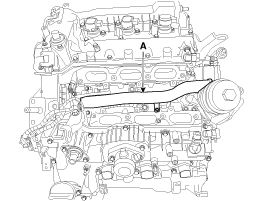
Remove the water center pipe (A).
|
| 4. |
Install in the reverse order of removal. |
Components 1. Water pipe 2. Throttle body coolant hose & pipe3. Water temperature control assembly4. O-ring
Components 1. Water pump pulley2. Water pump 3. Water pump gasket
Other information:
Kia Cadenza YG 2016-2021 Service Manual: Compressor Oil Repair procedures
Oil Specification 1. The HFC-134a system requires synthetic (PAG) compressor oil whereas the R-12 system requires mineral compressor oil. The two oils must never be mixed. 2. Compressor (PAG) oil varies according to compressor model. Be sure to use oil specified for the model of compressor.
Kia Cadenza YG 2016-2021 Service Manual: Cluster ionizer Description and Operation
Description 1. The function of cluster ion generator is cleaning air by sterilizing and dissolving of air conditioner. 2. The function of cluster ion generator is controlling mold caused by stench of air conditioner and external inflow of air.
Categories
- Manuals Home
- Kia Cadenza Owners Manual
- Kia Cadenza Service Manual
- Body (Interior and Exterior)
- General Information
- Engine Control / Fuel System
- New on site
- Most important about car

Copyright © 2026 www.kcadenzavg.com - 0.0242