Kia Cadenza YG: Seat & Power Seat / Rear Seat Repair procedures
| Replacement |
| 1. |
Remove the rear seat cushion (A).
|

| 2. |
Disconnect the rear seat cushion heater connectors (A).
|

| 3. |
After loosening the mounting bolts, then remove the rear seat back (A).
|
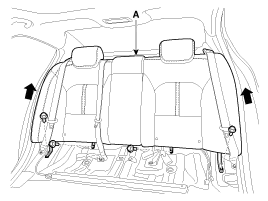
| 4. |
Disconnect the rear seat back heater (A) and airbag (B) connectors.
[LH]
[RH]
|


| 5. |
Installation is the reverse of removal.
|

|
| 1. |
Remove the rear seat assembly. |
| 2. |
Push the lock pin (B), remove the headrest (A).
|

| 3. |
Pull out the headrest guides (A) while pinching the end of the guides, and remove them.
|

| 4. |
Remove the hogring clips (A).
|

| 5. |
Disconnect the hogring clips (B) on the rear of seat back, remove the seat back cover (A).
|

| 6. |
Installation is the reverse of removal.
|

|
| 1. |
Remove the rear seat cushion. |
| 2. |
Remove the hogring clips (A).
|

| 3. |
Disconnect the hogring clips (B) on the rear of seat cushion, remove the seat cushion cover (A).
|

| 4. |
Installation is the reverse of removal.
|
| 1. |
Remove the rear seat back assembly. |
| 2. |
Disconnect the connectors (A), and mounting wireing clips (B).
|

| 3. |
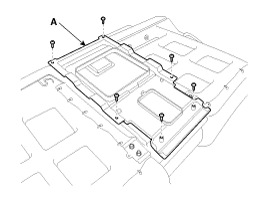
Loosen the armrest back panel mounting bolts.
|

| 4. |
After loosening the mounting screws, then remove the armrest back panel (A).
|
| 5. |
Remove the armrest (A).
|

| 6. |
Installation is the reverse of removal.
|
Components 1. Rear luggage bar2. Headrest3. Headrest guide4. Rear back armrest5. Web guide6. Rear seat back pad7. Sab support bracket8. Rear back heater unit assembly9.
Other information:
Kia Cadenza YG 2016-2021 Service Manual: Description and Operation
Description Back view camera will activate when the backup light is ON with the ignition switch ON and the shift lever in the R position. This system is a supplemental system that shows behind the vehicle through the ECM (Reverse Display Room Mirror) mirror or AVN head unit while backing-up.
Kia Cadenza YG 2016-2021 Service Manual: Compressor Oil Repair procedures
Oil Specification 1. The HFC-134a system requires synthetic (PAG) compressor oil whereas the R-12 system requires mineral compressor oil. The two oils must never be mixed. 2. Compressor (PAG) oil varies according to compressor model. Be sure to use oil specified for the model of compressor.
Categories
- Manuals Home
- Kia Cadenza Owners Manual
- Kia Cadenza Service Manual
- Automatic Transaxle System
- Specifications
- Battery Troubleshooting
- New on site
- Most important about car
