Kia Cadenza YG: ESC(Electronic Stability Control) System / Rear Wheel Speed Sensor Repair procedures
| Removal |
| 1. |
Remove the rear wheel and tire.
|
| 2. |
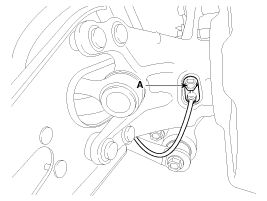
Remove the rear wheel speed sensor mounting bolt (A).
|
| 3. |
Remove the rear seat back.
(Refer to the Body - "Seat") |
| 4. |
Disconnect the rear wheel speed sensor connector. |
| 5. |
Installation is the reverse of removal.
|

| Inspection |
| 1. |
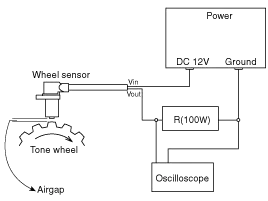
Measure the output voltage between the terminal of the wheel speed sensor and the body ground.
|
| 2. |
Compare the change of the output voltage of the wheel speed sensor to the normal change of the output voltage as shown below.
|

Components 1. Rear wheel speed sensor 2. Rear wheel speed sensor cable
Description When the vehicle is turning with respect to a vertical axis the yaw rate sensor detects the yaw rate electroniclly by the vibration change of plate fork inside the yaw rate sensor.
Other information:
Kia Cadenza YG 2016-2021 Service Manual: Intake Actuator Repair procedures
Inspection 1. Ignition "OFF". 2. Disconnect the intake actuator connector. 3. Verify that the actuator operates to the recirculation position when connecting 12V to the terminal 3 and grounding terminal 7. 4. Verify that the intake actuator operates to the fresh position when connecting in the reverse.
Kia Cadenza YG 2016-2021 Service Manual: Heater & A/C Control Unit (DATC) Repair procedures
Inspection Self diagnosis 1. Self-diagnosis process 2. How to read self-diagnostic code. After the display panel flickers three times every 0.5 second, the corresponding fault code flickers on the setup temperature display panel every 0.
Categories
- Manuals Home
- Kia Cadenza Owners Manual
- Kia Cadenza Service Manual
- Alternator Schematic Diagrams
- Driveshaft and axle
- Body Electrical System
- New on site
- Most important about car
