Kia Cadenza YG: Interior / Crash Pad Components and Components Location
| Components |
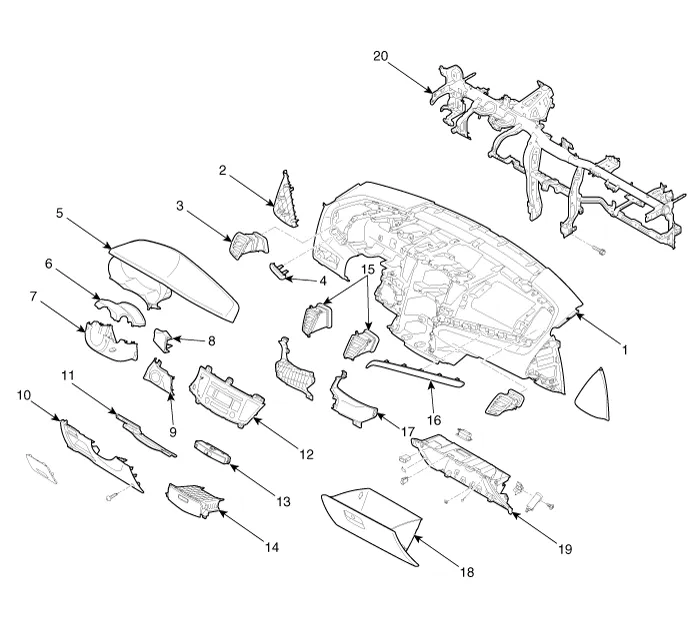
| 1. Main crash pad assembly 2. Crash pad side cover 3. Side airvent duct 4. Crash pad garnish (LH) 5. Cluster fascia panel 6. Shroud upper panel 7. Shroud lower panel | 8. Crash pad center garnish 9. Ignition key grommet 10. Crash pad lower panel 11. Reinforcing panel 12. Center facia upper panel 13. Digital clock 14. Center facia lower tray | 15. Center airvent duct 16. Crash pad garnish (RH) 17. Center crash pad side cover 18. Glove box 19. Glove box housing 20. Cowl cross bar assembly |
Replacement Floor Console Replacement • When prying with a flat-tip screwdriver, wrap it with protective tape, and apply protective tape around the related parts, to prevent damage.
Replacement Cluster Replacement • When prying with a flat-tip screwdriver, wrap it with protective tape, and apply protective tape around the related parts, to prevent damage.
Other information:
Kia Cadenza YG 2016-2021 Service Manual: Blower Unit Components and Components Location
Component Location Components 1. Duct Seal2. Duct Case3. Inlet Door4. Intake Actuator5. Inlet Duct Case (A)6. Climate control air filter7. Cluster Ionizer8. Climate control air filter Cover9. Blower Upper Case10. Blower Lower Case11. FET12. Resistor13.
Kia Cadenza YG 2016-2021 Service Manual: Heater & A/C Control Unit (DATC) Repair procedures
Inspection Self diagnosis 1. Self-diagnosis process 2. How to read self-diagnostic code. After the display panel flickers three times every 0.5 second, the corresponding fault code flickers on the setup temperature display panel every 0.
Categories
- Manuals Home
- Kia Cadenza Owners Manual
- Kia Cadenza Service Manual
- Alternator Schematic Diagrams
- Transaxle Control Module (TCM) Repair procedures
- General Information
- New on site
- Most important about car
