Kia Cadenza YG: Lighting System / Components and Components Location
| Component Location (1) |
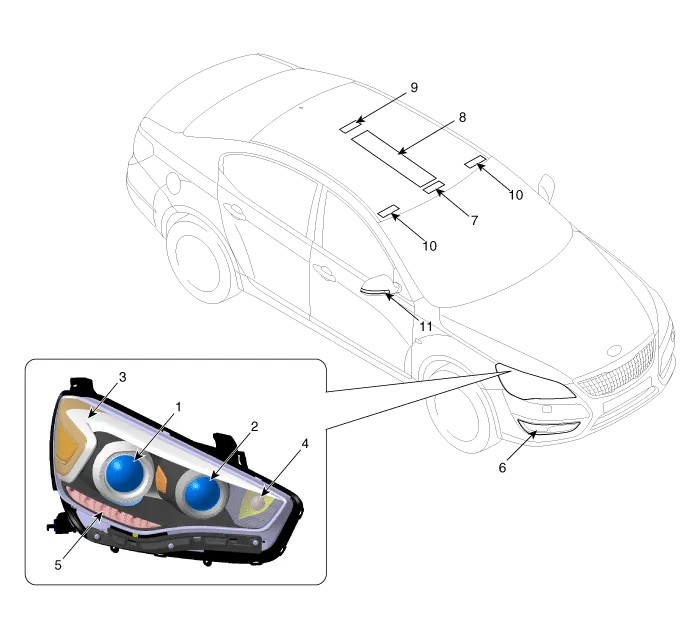
| 1. Head lamp (Low) 2. Head lamp (High) 3. Position lamp 4. Turn signal lamp 5. DRL 6. Fog lamp | 7. Overhead console lamp (General/ Panorama roof) 8. Deluxe overhead console lamp (Mode lamp + Map lamp + Room lamp) 9. Room lamp 10. Vanity lamp 11. Side repeater lamp (Outside mirror) |
| Component Location (2) |
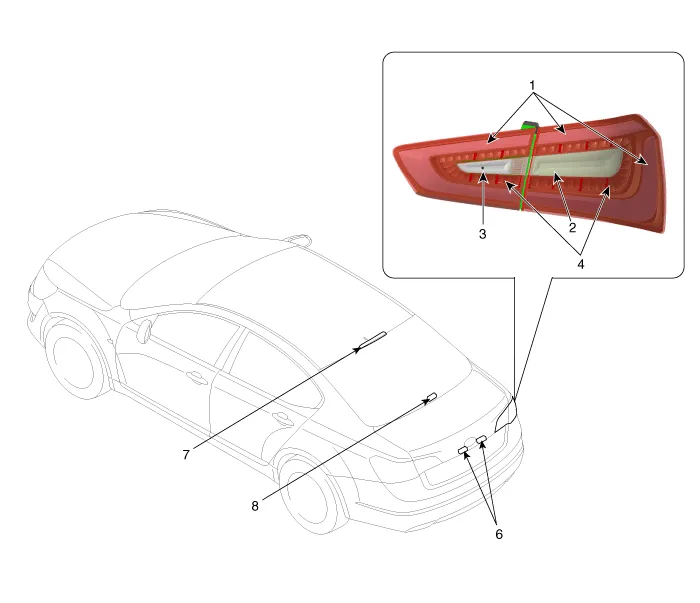
| 1. Stop and tail lamp 2. Turn signal almp 3. Back-up lamp 4. Stop lamp | 5. License plate lamp 6. High mounted stop lamp 7. Trunk lamp |
Specification ItemTypeWattage (W)FrontHead lamp (High)H965Head lamp (Low)H7/ D1S (HID)55/ 35(HID)Front turn signal lampPY28/828WPosition lampLEDLEDSide repeater lamp (Outside mirror)LEDLEDFront fog lampGeneralH835LEDLEDLEDRearStop and tail lampLEDLEDRear turn signal lampPY2727WBack-up lampW16W16High mounted stop lampLEDLEDLicense plate lampW5W5WInteriorOverhead console lampDeluxeLEDLEDGeneralW10W10WRoom lampFESTOON5Trunk lampFESTOON5Vanity lampFESTOON5
Component 1. Head lamp assembly lens & housing2. Head lamp high beam bulb3. Dust cap (High)4. Head lamp low beam bulb5. Dust cap (Low)6. Turn signal lamp socket7.
Other information:
Kia Cadenza YG 2016-2021 Service Manual: Ambient Sensor Repair procedures
Inspection 1. Ignition "OFF" 2. Disconnect ambient temperature sensor. 3. Check the resistance of ambient temperature sensor between terminals 1 and 2 whether it is changed by changing of the ambient temperature. 1. Sensor Ground2.
Kia Cadenza YG 2016-2021 Service Manual: Power Mosfet Repair procedures
Inspection 1. Ignition "ON" 2. Manually operate the control switch and measure the voltage of blower motor. 3. Select the control switch to raise voltage until high speed. Specification FanMotor VoltageManualFirst speed3.8 ±0.5VSecond speed5.
Categories
- Manuals Home
- Kia Cadenza Owners Manual
- Kia Cadenza Service Manual
- Body (Interior and Exterior)
- Components and Components Location
- Automatic Transaxle System
- New on site
- Most important about car
