
Kia Cadenza YG: Parking Brake System / Electric Parking Brake (EPB) Repair procedures
| Removal |
| 1. |
Turn ignition OFF and disconnect the negative (-) battery cable. |
| 2. |
Remove the crash pad lower panel and reinforcing panel (A).
(Refer to the Body group - “Crash pad”) |
| 3. |
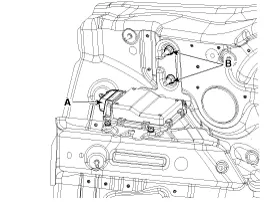
EPB control unit mounting nuts (B) and then remove EPB control unit.
|
| 4. |
Disconnect the EPB control unit connector (A). |
| Installation |
| 1. |
Installation is the reverse of removal. |
| 2. |
Check that the brake operates normally by pushing the EPB switch more than 3 times after installing the EPB module.
|
EPB Circuit Diagram EPB connector input/output Pin No.Description1CAN_High2CAN_Low18IGN (+)19EPB Switch Signal 121EPB Switch Signal 327EPB Switch Signal 229EPB Switch Signal 433Rear Left Motor (-)34Ground35Ground36Rear Right Motor (-)37Rear Right Motor (+)38Rear Left Motor (+)39Battery (Rear Right Motor)40Battery (Rear Left Motor)
Removal 1. Turn ignition OFF and disconnect the negative (-) battery cable. 2. Remove the floor console upper cover. (Refer to Body group - "Console") 3.
Other information:
Kia Cadenza YG 2016-2021 Service Manual: Pantoscopic Camera Repair procedures
Removal Front Pantoscopic Camera 1. Disconnect the negative (-) battery terminal. 2. Remove the front bumper cover. (Refer to Body - "Front Bumper Cover") 3. Remove the pantocscpic camera (B) after loosening the mounting screws and connector (A).
Kia Cadenza YG 2016-2021 Service Manual: Photo Sensor Description and Operation
Description 1. The photo sensor is located at the center of defrost nozzle. 2. The photo sensor contains a photovoltaic (sensitive to sunlight) diode. The solar radiation received by its light receiving portion, generates an electromotive force in proportion to the amount of radiation received which is transferred to the automatic tem
Categories
- Manuals Home
- Kia Cadenza Owners Manual
- Kia Cadenza Service Manual
- Schematic Diagrams
- Automatic Transaxle System
- Timing Chain Repair procedures
- New on site
- Most important about car
