Kia Cadenza YG: Exterior / Fender Repair procedures
Kia Cadenza YG 2016-2021 Service Manual / Body (Interior and Exterior) / Exterior / Fender Repair procedures
| Replacement |
|

| 1. |
Remove the front bumper.
(Refer to the BD group - "Front Bumper") |
| 2. |
Remove the head lamps.
(Refer to the BE group - "Head Lamps") |
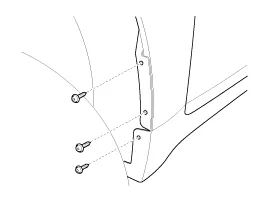
| 3. |
Loosen the mud mounting screws.
|
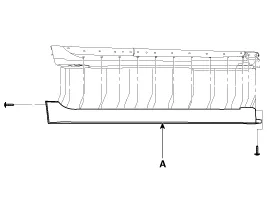
| 4. |
After loosening the mounting screws and clips, then remove the side sill garnish (A).
|
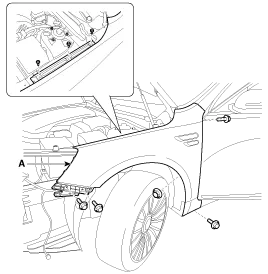
| 5. |
After loosening the fender mounting bolts and nut, then remove the fender (A).
|
| 6. |
Installation is the reverse of removal. |
Replacement Hood Assembly Replacement • When removing and installing the hood, an assistant is necessary. • Be careful not to damage the hood and body.
Other information:
Kia Cadenza YG 2016-2021 Service Manual: Auto Head lamp leveling Unit Repair procedures
Removal Height Sensor 1. Remove the height sensor connector (A). 2. Loosen the mounting bolts(Body: 2EA, chassis: 1EA) from height sensor bracket. Tightening torque : 3 ~ 5N.m (30 ~ 50kgf.m, 2.21 ~ 3.68lb-ft) 3. Remove the height sensor.
Kia Cadenza YG 2016-2021 Service Manual: Specifications
Specification Air Conditioner ItemSpecificationCompressorType6VSX16Oil type & CapacityPAG OIL 100±10Pulley type6PK-TYPEDisplacement160cc/revCondenserHeat rejection14,400 ±5% kcal/hrA/C Pressure transducerThe method to measure the pressureVoltage= 0.
Categories
- Manuals Home
- Kia Cadenza Owners Manual
- Kia Cadenza Service Manual
- Engine Control / Fuel System
- Battery Troubleshooting
- Specifications
- New on site
- Most important about car

Copyright © 2026 www.kcadenzavg.com - 0.0217