Kia Cadenza YG: Exterior / Hood Repair procedures
Kia Cadenza YG 2016-2021 Service Manual / Body (Interior and Exterior) / Exterior / Hood Repair procedures
| Replacement |
Hood Assembly Replacement
|

| 1. |
Using a screwdriver, lift the socket clips (A) up slightly on both ends of the lifter (B).
|

| 2. |
After loosening the hood hinge (A) mounting bolts, remove the hood panel (B). |
| 3. |
Remove the washer nozzle (C).
|

| 4. |
Installation is the reverse of removal.
|
Hood Insulator Pad Replacement
| 1. |
Using a clip remover, detach the clips, and remove the hood insulator pad (A).
|


| 2. |
Installation is the reverse of removal.
|
Hood Lift Replacement
| 1. |
Using a screwdriver (A), lift the socket clips (B) up
slightly on both ends of the lifter (C), and then remove the lifter from
the bracket (D).
|

| 2. |
Installation is the reverse of removal. |
Hood Seal Weatherstrip Replacement
| 1. |
Detach the clips, then remove the hood seal weatherstrip (A).
|

| 2. |
Installation is the reverse of removal.
|
Hood Weatherstrip Replacement
| 1. |
Remove the glue on end of both sides before removing the hood weatherstrip (A).
|

| 2. |
Installation is the reverse of removal. |
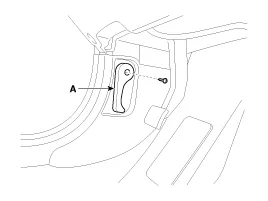
Hood Release Handle Replacement
| 1. |
After loosening the mounting screw, then remove the hood release handle (A).
|
| 2. |
Installation is the reverse of removal.
|
Hood Latch Replacement
| 1. |
Remove the front bumper cover.
(Refer to the BD group - "Front Bumper") |
| 2. |
Detach the clips, then remove hood latch cover (A).
|

| 3. |
Remove the hood latch (A) mounting bolts.
|

| 4. |
Disconnect the hood latch cable (A) and remove the hood latch (B).
|

| 5. |
Installation is the reverse of removal.
|
| Adjustment |
Adjust Hood
| 1. |
After loosening the hinge (A) mounting bolt, adjust the hood (B) by moving it up or down, or right or left. |
| 2. |
Adjust the hood height by turning the hood overslam bumpers (C). |
| 3. |
After loosening the hood latch (D) mounting bolts, adjust the latch by moving it up or down, or right or left.
|

Replacement • Be careful not to damage the fender and body. • When removing the clips, use a clip remover.
Replacement Trunk Lid Assembley Replacement • When removing and installing the trunk lid, an assistant is necessary.
Other information:
Kia Cadenza YG 2016-2021 Service Manual: Specifications
S
Kia Cadenza YG 2016-2021 Service Manual: Evaporator unit Repair procedures
Inspection 1. Ignition "OFF". 2. Disconnect evaporator temperature sensor. 3. Using the multi-tester, Measure resistance between terminal "1" and "2" of evaporator temperature sensor. Specification Evaporator coretemperature [°C(°F)]Resistance[KΩ]Voltage[V]-20(-4)70.
Categories
- Manuals Home
- Kia Cadenza Owners Manual
- Kia Cadenza Service Manual
- Automatic Transaxle System
- Engine Control / Fuel System
- Body Electrical System
- New on site
- Most important about car

Copyright © 2026 www.kcadenzavg.com - 0.0217