Kia Cadenza YG: Lighting System / Overhead Console Lamp Repair procedures
| Inspection |
| Overhead Console Lamp |

| No. | Description | No. | Description |
| 1 | Mood (+) | 4 | Battery (+) |
| 2 | - | 5 | Door (-) |
| 3 | Master (+) | 6 | GND |


| Removal |
| Overhead Console Lamp |
| 1. |
Disconnect the negative (-) battery terminal. |
| 2. |
Remove the overhead console lamp assembly.
(Refer to Body - "Roof Trim") |
| 3. |
Remove the overhead console lamp (B) after disconnecting the panoramaroof switch connector and lamp connector (A).
|

| 4. |
If necessary to replace the bulb, replace the bulb (C). |
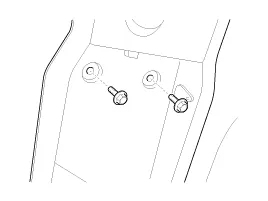
| Deluxe Overhead Console Lamp |
| 1. |
Disconnect the negative (-) battery terminal. |
| 2. |
Open the holder and then remove the bolts (2EA).
|
| 3. |
Remove the deluxe overhead console lamp assembly.
(Refer to Body - "Roof Trim") |
| 4. |
Disconnect the connector (A).
|

| Installation |
| Overhead Console Lamp |
| 1. |
Install the overhead console lamp after connecting the panoramaroof switch connector and lamp connector. |
| 2. |
Install the lens after tightening 2 screws. |
| Deluxe Overhead Console Lamp |
| 1. |
Install the deluxe overhead console lamp assembly after connecting the connector. |
Inspection Room Lamp 1. Check that the switch operates properly after disconnecting the room lamp connector (A). Removal Room Lamp 1. Disconnect the negative(-) battery terminal.
Removal 1. Disconnect the negative(-) battery terminal. 2. Disconnect the connector (B) after removing the license lamp assembly (A). 3. Turn the license bulb socket (A) counterclockwise to remove the bulb.
Other information:
Kia Cadenza YG 2016-2021 Service Manual: Description and Operation
Description The immobilizer system will disable the vehicle unless the proper ignition key is used, in addition to the currently available anti-theft systems such as car alarms, the immobilizer system aims to drastically reduce the rate of auto theft.
Kia Cadenza YG 2016-2021 Service Manual: Blind Spot Detection Variant Coding Description and Operation
Description The used radar frequency of BSD is two, "North America region" and "Except North America region". If it replaces BSD unit, BSD unit has to perform the procedure of variant coding. BSD Variant Coding 1. Select the "BSD Variant Coding" procedure in BSD system.
Categories
- Manuals Home
- Kia Cadenza Owners Manual
- Kia Cadenza Service Manual
- Steering System
- Body (Interior and Exterior)
- General Information
- New on site
- Most important about car
