Kia Cadenza YG: Rear Suspension System / Rear Assist Arm Repair procedures
Kia Cadenza YG 2016-2021 Service Manual / Suspension System / Rear Suspension System / Rear Assist Arm Repair procedures
| Replacement |
| 1. |
Remove the rear wheel & tire.
|

| 2. |
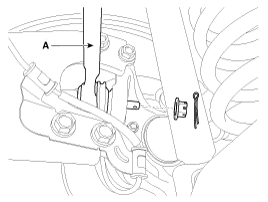
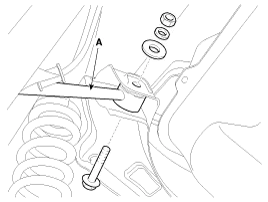
Remove the sprit pin and castle nut and then disconnect the rear assist arm (A) from the rear axle.
|
| 3. |
Loosen the bolt & nut and then remove the rear assist arm (A) with the sub frame.
|
| 4. |
Installation is the reverse of removal. |
| Inspection |
| 1. |
Check the bushing for wear and deterioration. |
| 2. |
Check the rear lower arm for deformation. |
| 3. |
Check the coil spring and spring pad for deterioration and deformation. |
| 4. |
Check for all bolts and nut. |
Replacement 1. Remove the rear wheel & tire. Tightening torque: 88.3 ~ 107.9N.m (9.0 ~ 11.0kgf.m, 65.1 ~ 79.6lb-ft) Be careful not to damage to the hub bolts when removing the rear wheel & tire.
Replacement 1. Remove the rear wheel & tire. Tightening torque: 88.3 ~ 107.9N.m (9.0 ~ 11.0kgf.m, 65.1 ~ 79.6lb-ft) Be careful not to damage to the hub bolts when removing the rear wheel & tire.
Other information:
Kia Cadenza YG 2016-2021 Service Manual: Components and Components Location
C
Kia Cadenza YG 2016-2021 Service Manual: Receiver-Drier Repair procedures
Replacement 1. Remove the condenser, and then remove the bottom cap (B) with L wrench (A) from the condenser. Tightening torque : 9.8~14.7N.m (1.0~1.5kgf.m, 7.2~10.8 lb-ft) 2. Remove the desiccant (A) from condenser using a long nose plier.
Categories
- Manuals Home
- Kia Cadenza Owners Manual
- Kia Cadenza Service Manual
- Specifications
- Engine Electrical System
- Timing Chain Repair procedures
- New on site
- Most important about car

Copyright © 2026 www.kcadenzavg.com - 0.0373