
Kia Cadenza YG: ESC(Electronic Stability Control) System / Rear Wheel Speed Sensor Repair procedures
| Removal |
| 1. |
Remove the rear wheel and tire.
|
| 2. |
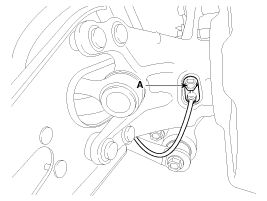
Remove the rear wheel speed sensor mounting bolt (A).
|
| 3. |
Remove the rear seat back.
(Refer to the Body - "Seat") |
| 4. |
Disconnect the rear wheel speed sensor connector. |
| 5. |
Installation is the reverse of removal.
|

| Inspection |
| 1. |
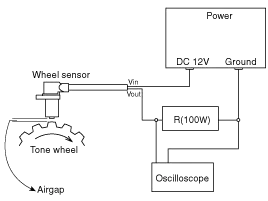
Measure the output voltage between the terminal of the wheel speed sensor and the body ground.
|
| 2. |
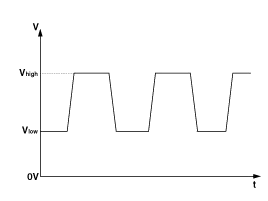
Compare the change of the output voltage of the wheel speed sensor to the normal change of the output voltage as shown below.
|
Components 1. Rear wheel speed sensor 2. Rear wheel speed sensor cable
Description When the vehicle is turning with respect to a vertical axis the yaw rate sensor detects the yaw rate electroniclly by the vibration change of plate fork inside the yaw rate sensor.
Other information:
Kia Cadenza YG 2016-2021 Service Manual: Description and Operation
Description Surround View Monitoring System (SVM) is the system that allows video monitoring of 360 degrees around the vehicle. The system includes 4 ultra optical camera mounted around the vehicle (front, both sides, rear). The video from these cameras are applied with distortion compensation, time point conversion, and video merging
Kia Cadenza YG 2016-2021 Service Manual: Troubleshooting
Troubleshooting Examples of False-Alarm Occurrence from system characteristics (It’s not a problem) – Characteristics of EM Wave : EM Waves are reflected against all material and especially metal very well. Reflections of EM Waves are varies with the shape of object.
Categories
- Manuals Home
- Kia Cadenza Owners Manual
- Kia Cadenza Service Manual
- Engine Mechanical System
- Emission Control System
- Automatic Transaxle System
- New on site
- Most important about car
