Kia Cadenza: Engine Control System / Manifold Absolute Pressure Sensor (MAPS) Repair procedures
Kia Cadenza YG 2016-2025 Service Manual / Engine Control / Fuel System / Engine Control System / Manifold Absolute Pressure Sensor (MAPS) Repair procedures
| Inspection |
| 1. |
Connect the GDS on the Data Link Connector (DLC). |
| 2. |
Measure the output voltage of the MAPS at idle and IG ON.
|
| Removal |
| 1. |
Turn the ignition switch OFF and disconnect the battery negative (-) cable. |
| 2. |
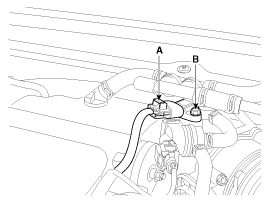
Disconnect the manifold absolute pressure sensor connector (A). |
| 3. |
Remove the installation bolt (B), and then vertically remove the sensor from the surge tank.
|
| Installation |
|
|
| 1. |
Install in the reverse order of removal.
|
 Manifold Absolute Pressure Sensor (MAPS) Schematic Diagrams
Circuit Diagram
...
 Engine Coolant Temperature Sensor (ECTS) Description and Operation
Description
Engine Coolant Temperature Sensor (ECTS) is located in the
engine coolant passage of the cylinder head for detecting the engine
coolant temperature. The ECTS uses a thermistor whose ...
Other information:
Kia Cadenza YG 2016-2025 Owners Manual: Instrument panel overview
1. Steering wheel audio controls (Refer to "Car Infotainment System Quick Reference Guide".) 2. Driver's front air bag 3. Horn 4. Instrument cluster 5. Wiper/Washer 6. ENGINE START/STOP button 7. Cruise button Lane Driving Assist button 8. Infotainment System screen (Refer to ...
Kia Cadenza YG 2016-2025 Service Manual: Automatic Transaxle Components and Components Location
Components 1. Converter housing2. Automatic transaxle case3. Rear cover4. Valve body cover5. Manual control lever6. Air breather hose7. Inhibitor switch8. Solenoid valve connector ...
Copyright © www.kcadenzavg.com 2017-2025


