Kia Cadenza YG: ESC(Electronic Stability Control) System / Yaw-rate and G Sensor Repair procedures
Kia Cadenza YG 2016-2021 Service Manual / Brake System / ESC(Electronic Stability Control) System / Yaw-rate and G Sensor Repair procedures
| Removal |
| 1. |
Turn ignition switch OFF and disconnect the negative (-) battery cable. |
| 2. |
Remove the floor console.
(Refer to the Body - "Console") |
| 3. |
After removing the bolt (A), remove the rear vent duct (B).
|

| 4. |
Disconnect the yaw rate & lateral G sensor connector (A).
|

| 5. |
Remove the mounting bolts (B).
|
| 6. |
Installation is the reverse of removal. |
| G-Sensor Calibration |
| 1. |
Ignition "OFF", connect GDS. |
| 2. |
Ignition "ON" & Engine "OFF" select vehicle name and ESC system. |
| 3. |
Perform G-sensor calibration. |
| 4. |
After G-sensor calibration of ESC, enter into EPB system. |
| 5. |
Perform G-Sensor Calibration. |
| 6. |
Perform the " G-Sensor Calibration " procedure with GDS.
|
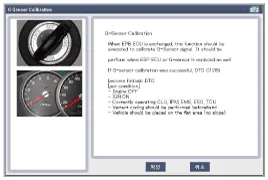
| 7. |
Complete the “G-Sensor Calibration” procedure. |
Description When the vehicle is turning with respect to a vertical axis the yaw rate sensor detects the yaw rate electroniclly by the vibration change of plate fork inside the yaw rate sensor.
Description 1. The ESC OFF switch is for the user to turn off the ESC system. 2. The ESC OFF lamp is on when ESC OFF switch is engaged.
Other information:
Kia Cadenza YG 2016-2021 Service Manual: Components and Components Location
C
Kia Cadenza YG 2016-2021 Service Manual: Cluster ionizer Repair procedures
Inspection 1. Press the OFF switch more then 4 times within 2 seconds while pressing the MODE switch. DisplayFail description00Normal50Cluster ionizer fault * Diagnostic procedure refer to DTC code. Replacement 1. Disconnect the negative (-) battery terminal.
Categories
- Manuals Home
- Kia Cadenza Owners Manual
- Kia Cadenza Service Manual
- Restraint
- Automatic Transaxle System
- Front Hub - Axle Repair procedures
- New on site
- Most important about car

Copyright © 2026 www.kcadenzavg.com - 0.0222